The Vigenère cipher is a method of encrypting alphabetic text by using a simple form of polyalphabetic substitution. Essentially it is a series of interwoven caesar ciphers, however it uses a word as a key instead of a number or series of numbers.
Think to yourself… What benefits could this have? What would it reduce?
Whilst a Vigenére Cipher is more difficult to break with brute force, it is more effective than a simple Ceasar Cipher. However, it can be broken if the length of the keyword is guessed.
How does it work?
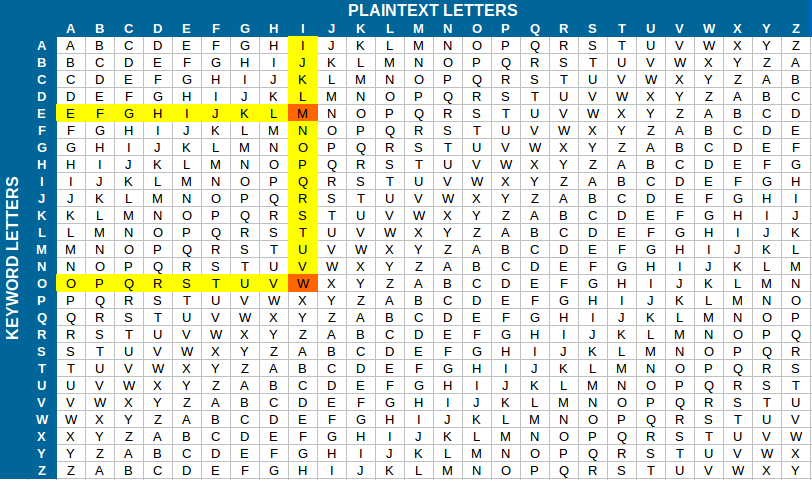
The Vignére Cipher uses a Vignére square to encrypt and decrypt text.
Let’s give it a go…
Joe’s favourite type of pizza is? CSTWZG
Key: CYBER
Race for the Code
Aims:
Be the first team to find the secret code and tell it to the teacher to win.
Rules:
Respect other classrooms by not disrupting others classes in the area.
Use this tool to select, move and resize objects (shapes, lines and text boxes).
Select multiple objects by holding Shift while selecting. Copy an object by dragging while holding Alt/Opt.
Click and drag to draw a rectangle. Hold Shift to create a square.
Click and drag to draw an ellipse. Hold the Shift key to create a perfectly round circle.
Click and drag to draw a triangle. Hold the Shift key to create a equilateral triangle. Use the Up and Down keys while dragging to change the number of sides, creating other shapes like diamonds, pentagons, and hexagons.
Draws straight lines. Hold Shift to draw perfectly straight lines at 90 and 45 degree angles.
Creates a text box.
Alignment Panel
Use these tools to align multiple objects. You can select multiple objects by holding shift while using the select tool.
You can find this panel in the top right corner of the window.
Align Up/Down/Left/Right
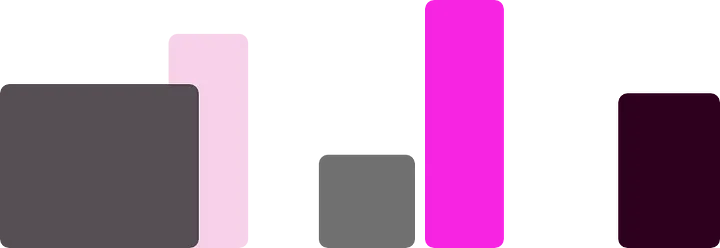
Aligns all selected objects to the desired side. See align bottom example below
Align Center
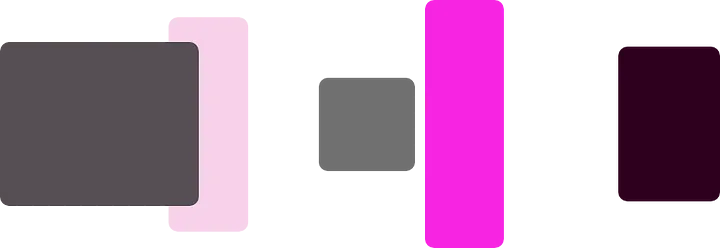
Aligns the centers of the selected objects on the chosen axis. See example bellow.
Distribute
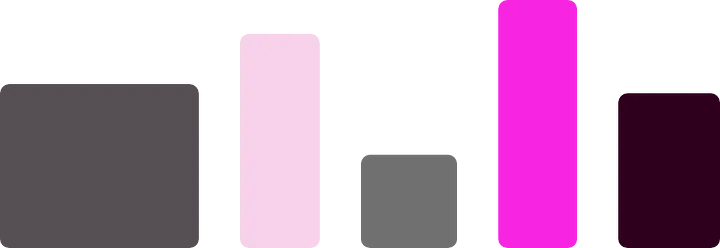
Evenly spaces objects along the chosen axis. See example below
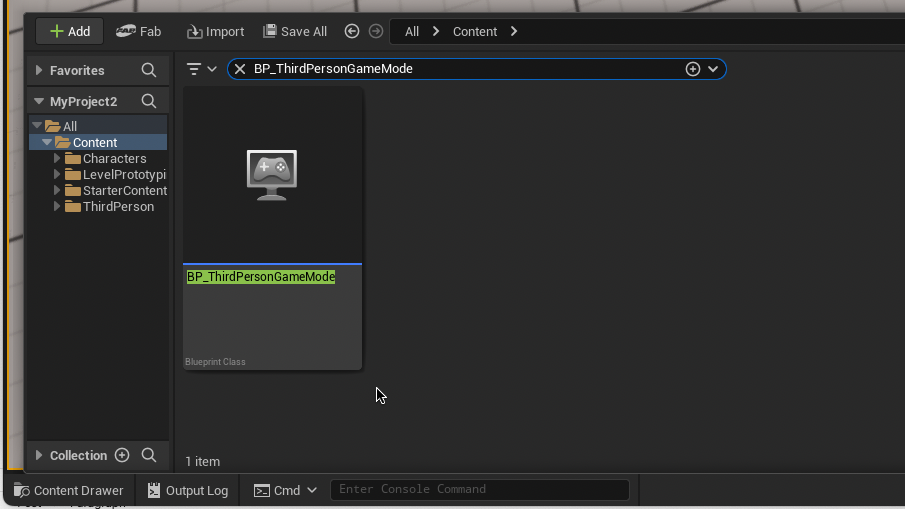
From the Content Drawer, search for “BP_ThirdPersonGameMode” and double-click to enter the blueprint.
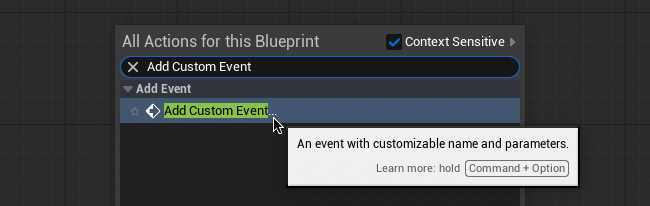
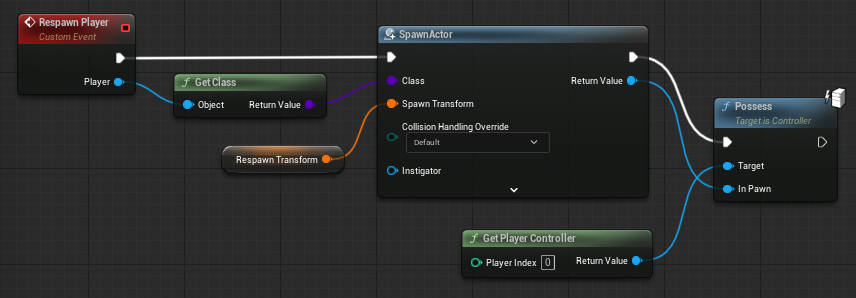
Right-click a blank area of the Event Graph to Add Custom Event. Name this event “Respawn Player”.
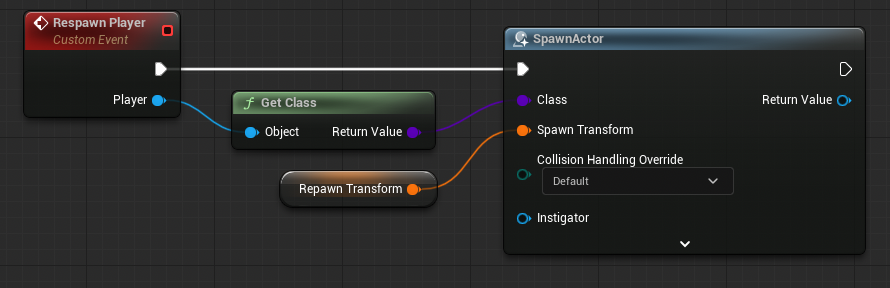
Drag and release from the white arrow of the new node to type and select “Spawn Actor From Class”.
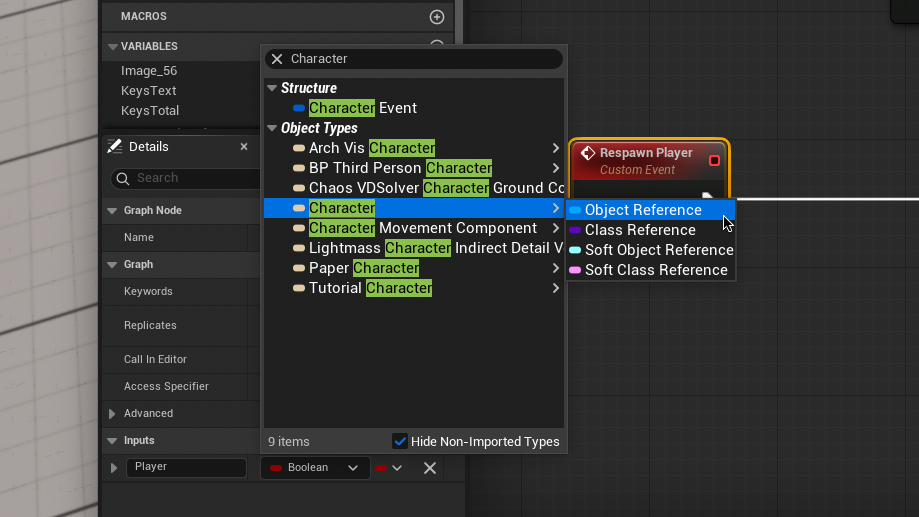
Select the Respawn Player node. In the Details menu create a new input and name this “Player”. Change the variable type from Boolean to a Character Object Reference.
Drag and release from the “Player” output of the Respawn Player event. Type and search “Get Class” and connect this to the Class input of the Spawn Actor Node. Right-click on “Spawn Transform” and Promote to variable and rename this “Respawn Transform”.
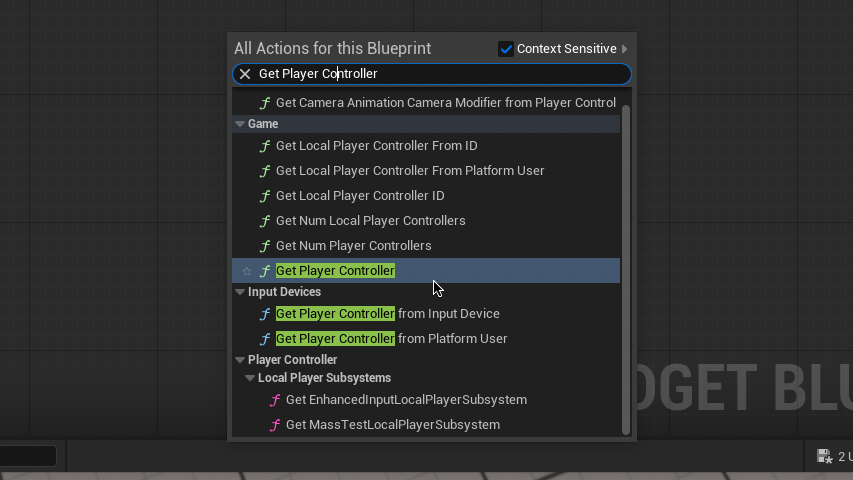
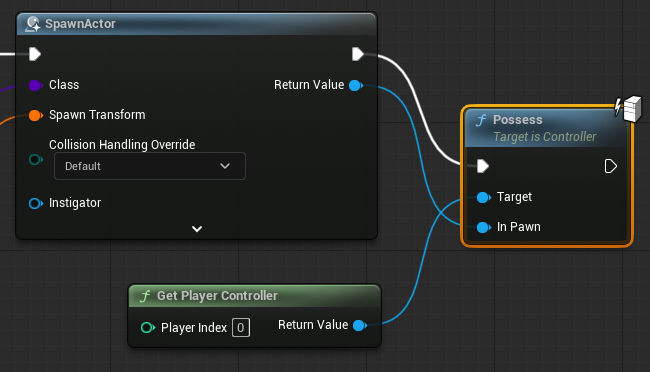
Now we need to return control to the player. In a blank area of the Event Graph, right-click to type and select “Get Player Controller”.
Drag from the Return value of this new node to type and select “Possess”. Connect the white and Return Value outputs of the Spawn Actor node to the white and In Pawn inputs of the Possess Node as shown above.
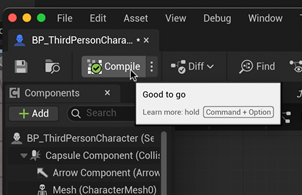
Your Event Graph should look like this. Compile and go to the “BP_ThirdPersonCharacter” blueprint.
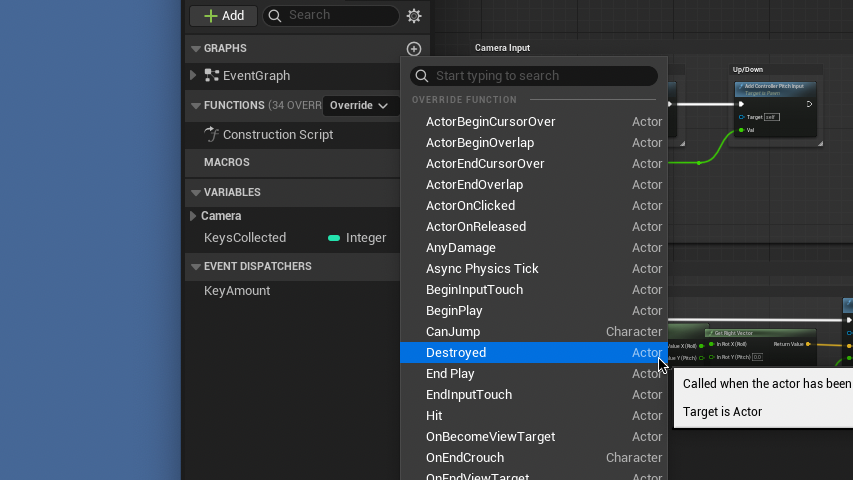
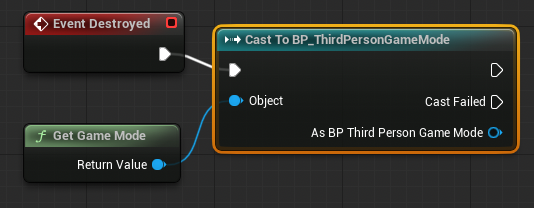
We now need to call the respawn function when the character dies. In the functions tab on the left, select Override > Destroyed.
From the new node, drag and release to select “Cast to BP_ThirdPersonGameMode”. From the Object input drag and release to select “Get Game Mode”.
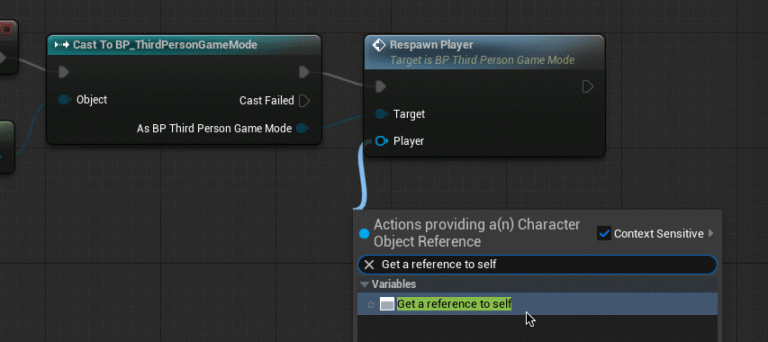
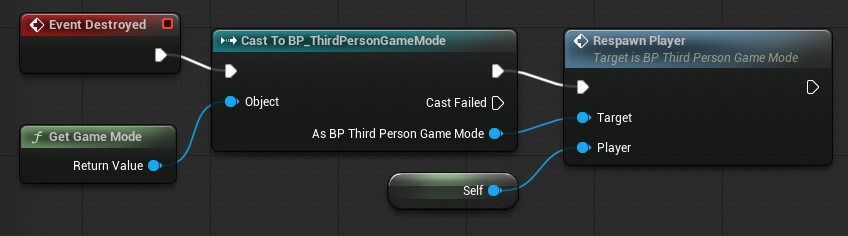
From “As BP Third Person Game Mode” drag and release to select “Respawn Player”. Drag and release from the player input of the new node to select “Get a reference to self”.
Your Event Graph should look like this. Compile and test by jumping off the platform. Your character should respawn in the air and fall to their doom over and over. We now need to set our respawn point.
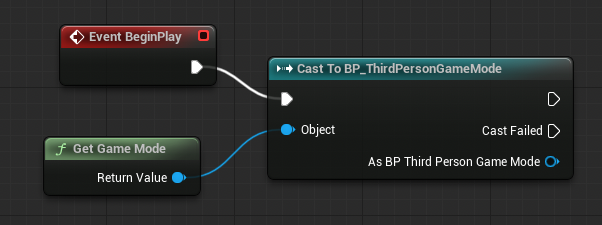
In a blank area of the Event Graph right-click and select “Event Begin Play”. Cast to “BP_ThirdPersonGameMode” and drag and release the object input to select “Get Game Mode”
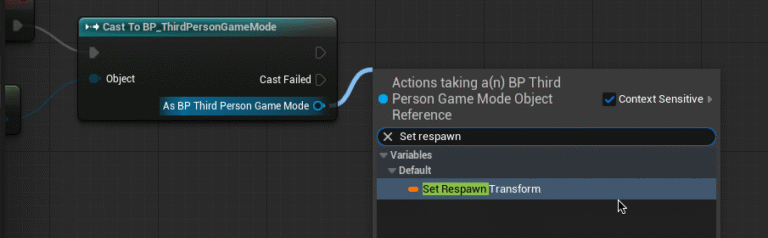
From “As BP Third Person Game Mode” of the new node, drag and release to select “Set Respawn Transform”.
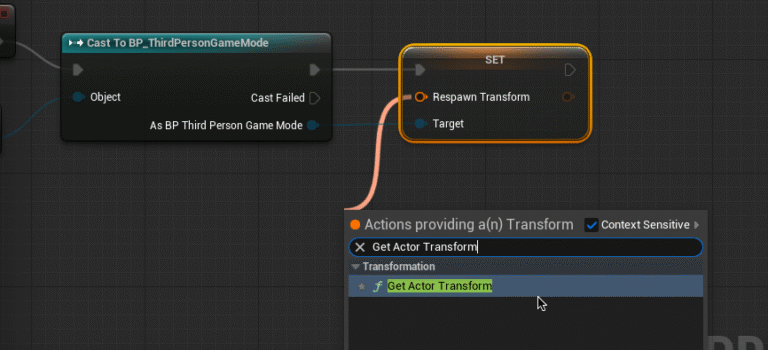
Connect Cast to BP_ThirdPersonGameMode to the new set node as shown. Drag and release from the Respawn Transform input to select “Get Actor Transform”. This sets the respawn point to the players position when the game starts.
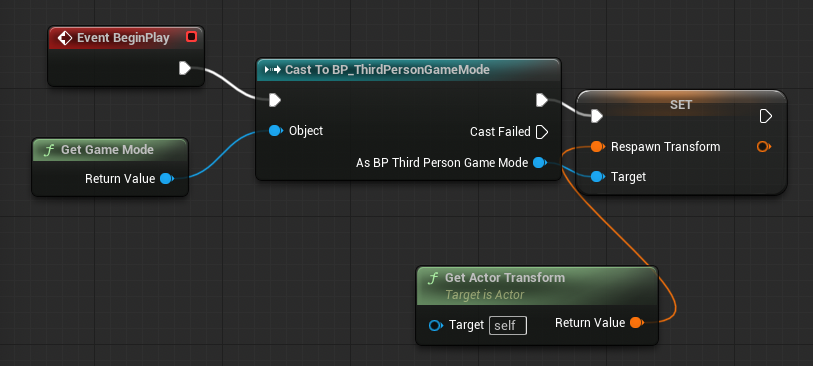
Your Event Graph should look like this. Compile and test by jumping off the edge of the platform.
Press Command + Spacebar, type “OneDrive” and select the top result or press Enter.
Follow the on screen prompts using your school email login details.
Be sure to allow access to “Documents” and “Desktop” when asked.
If you denied access to documents
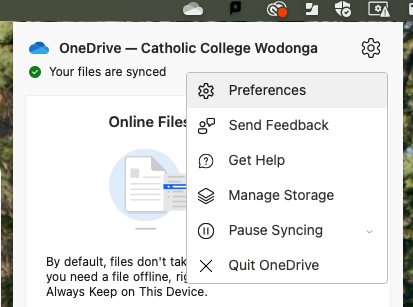
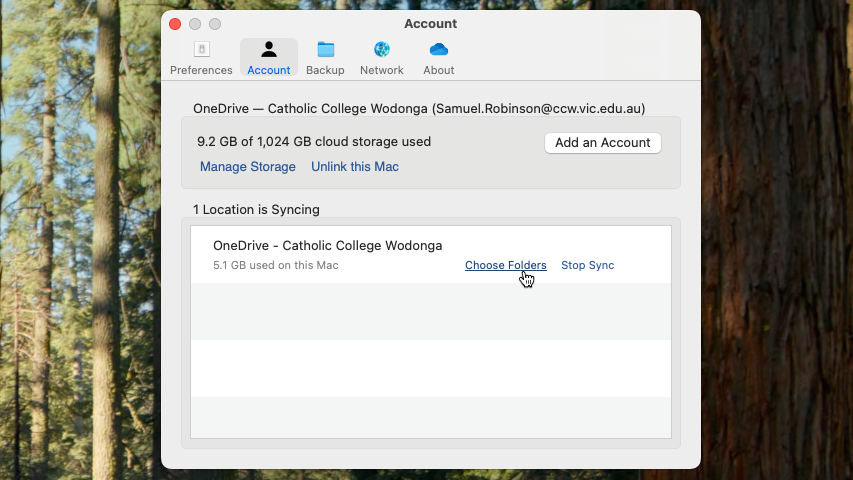
If you accidentally denied OneDrive access to your Desktop and Documents folders, you can restore this by clicking the OneDrive icon in the top-right corner of the screen.
Click the Settings icon in the top-right corner of the window and click Preferences.
In the Account Tab, click “Choose Folders“
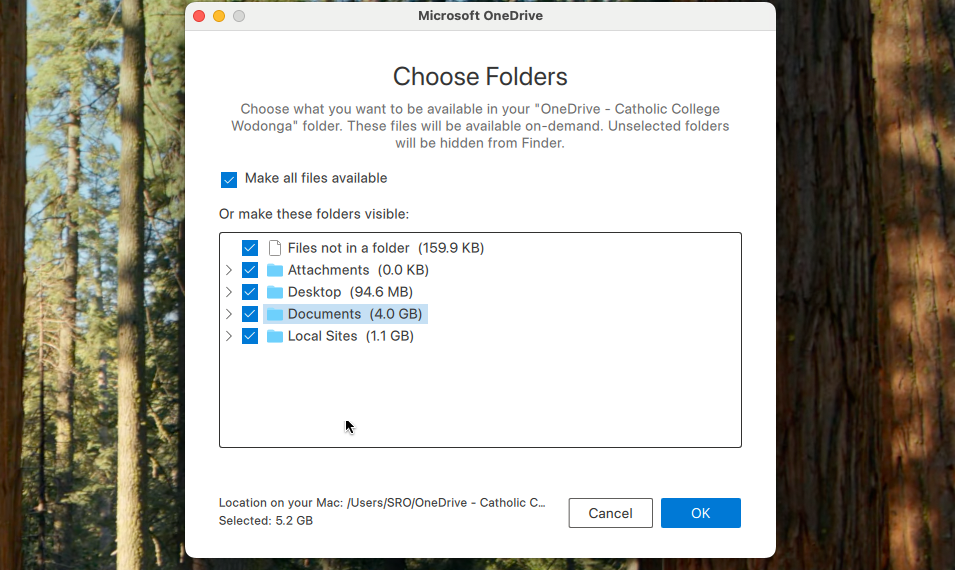
In the Choose Folders menu, ensure that “Desktop” and “Documents” are checked and press OK.
Install Adobe XD on your personal MacBook:
Press Command + Spacebar on your MacBook, type “Self Service”, and press Enter.
In the Self Service application, search for “Creative Cloud” and proceed with the download.
Once Creative Cloud is installed, open it by pressing Command + Spacebar, typing “Creative Cloud”, and pressing Enter.
Scroll down to find Adobe XD under the heading “More apps from Adobe” to install.
To activate AdobeXD use your school login information.
Now that we have created our collectables and door, we are going to combine these two elements to create a unlockable door that can be opened when the player has gathered all collectables.
While we could manually set the amount of collectables needed to open the door, we are going to have Unreal Engine automatically count the amount off collectables in the level at game launch instead.
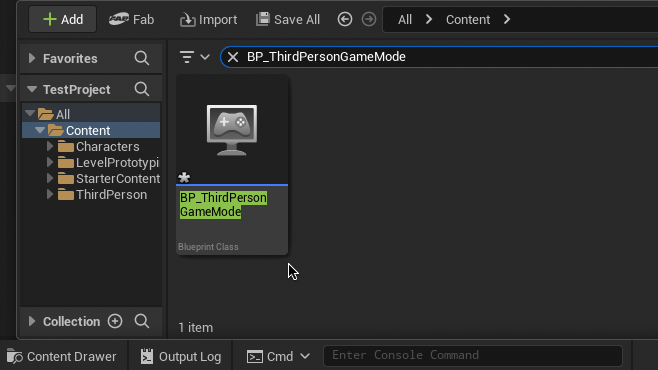
In the Content Drawer search for “BP_ThirdPersonGameMode”. Double-click to enter and open the Event Graph.
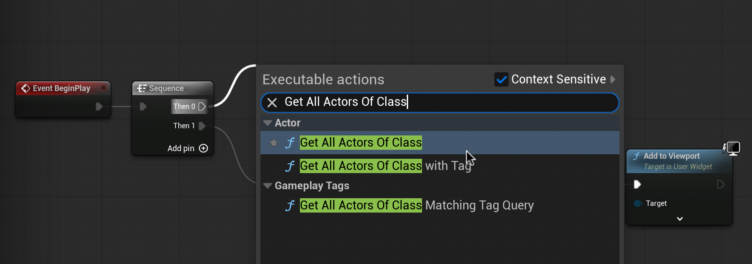
As you can see, we are already using Event BeginPlay. So that we can execute multiple functions we need to add a sequence.
Drag and release from Event BeginPlay. Type and select “Sequence”.
As we want to count the amount of collectables in the scene before loading the HUD, connect the previous node chain to “Then 1”. We can now start our new node chain.
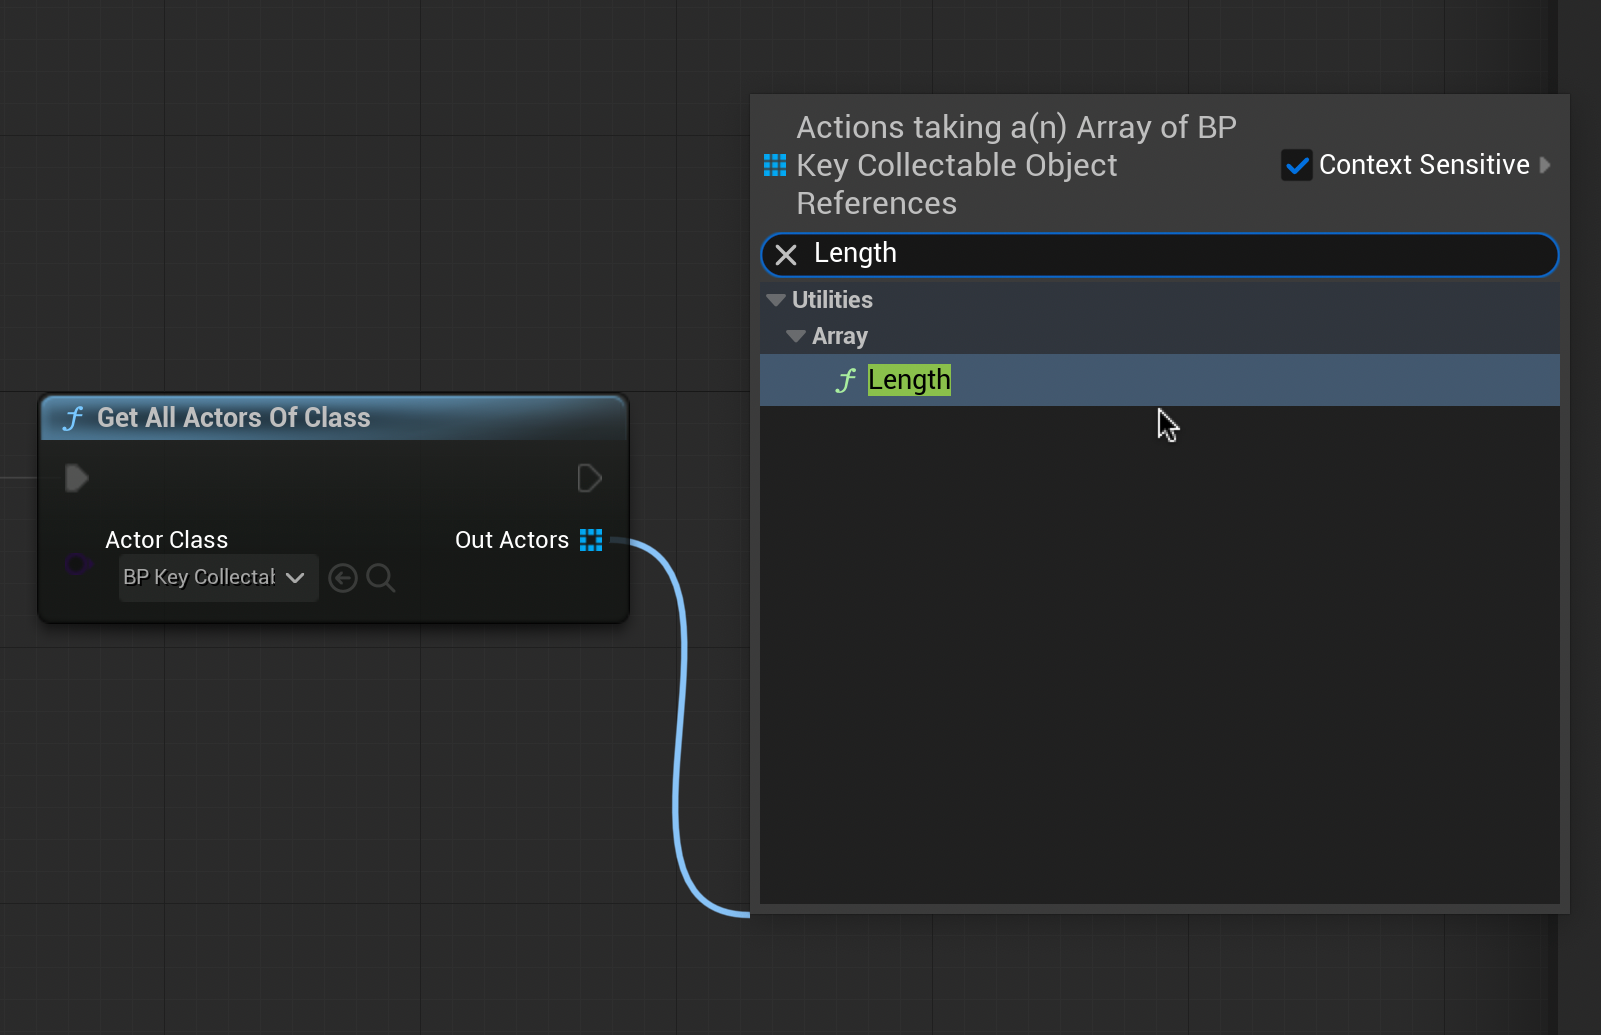
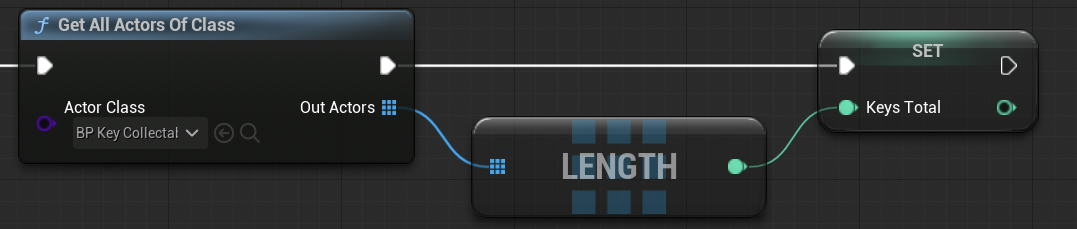
Drag and release from “Then 0”. Type and select “Get All Actors Of Class”. Set the actor class of this node to BP_[Item]Collectable (or whatever you named your collectable blueprint).
From the new node, drag and release from “Out Actions”. Type and select “Length”. This allows us to make the number of keys in the scene into a number we can reference later.
From the new Length node, drag and release. Select “Promote to Variable”. Name this variable “[Items]Total” in the Details Panel on the right. Connect the Get All Actors Of Class node to the [Items]Total node as shown.
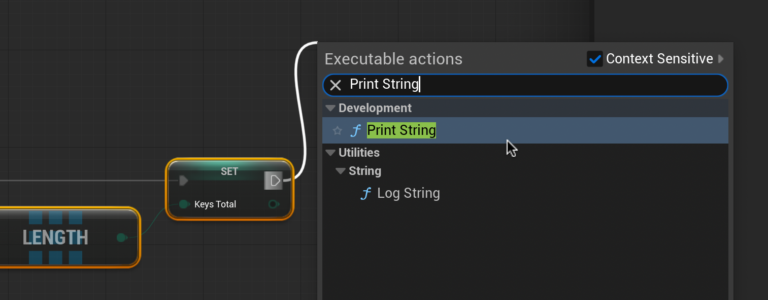
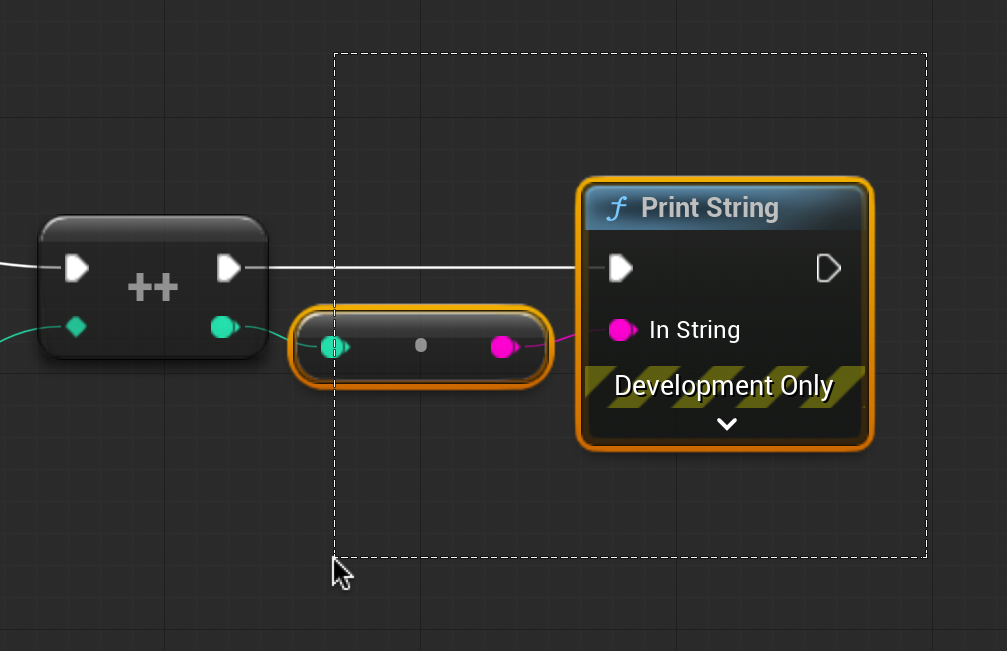
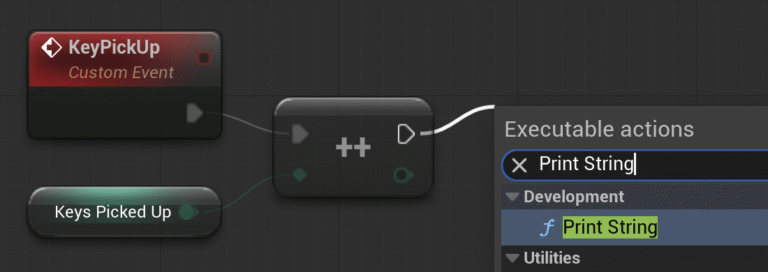
We can test if we are successfully counting the amount of collectables by dragging and releasing from the top-right arrow of the Set node.
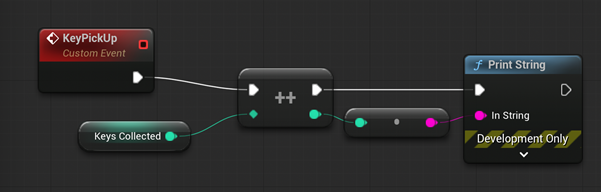
Type and select “Print String” and connect the mint green and magenta open connections. The Event Graph should look like this.
Compile and test. If successful the number of collectables in the scene will appear in light blue will appear in the top left corner immediately after pressing play. We can remove the Print String node after testing.
Head back to the WBP_HUD Event Graph. We will need to add additional nodes to display not only the items collected, but also the amount of collectables total.
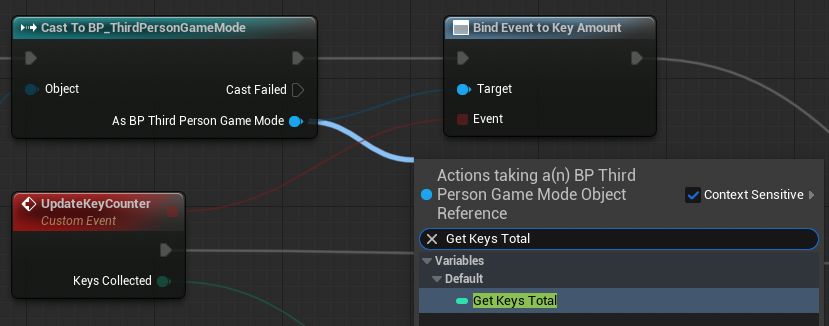
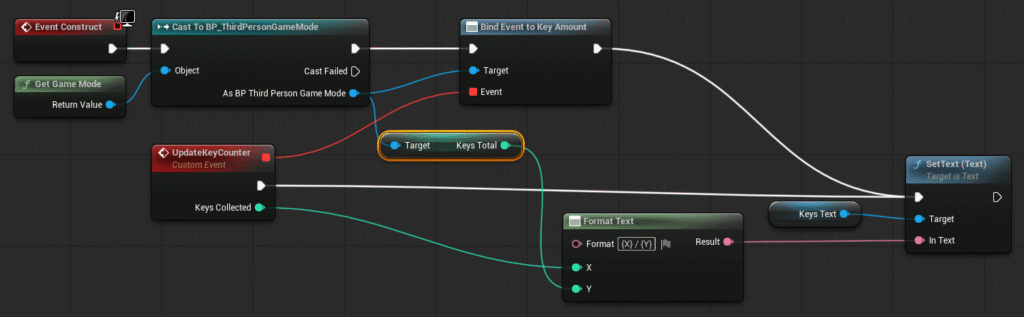
From the blue “As BP Third Person Game Mode” pin of the Cast node, drag and release to select “Get Keys Total”.
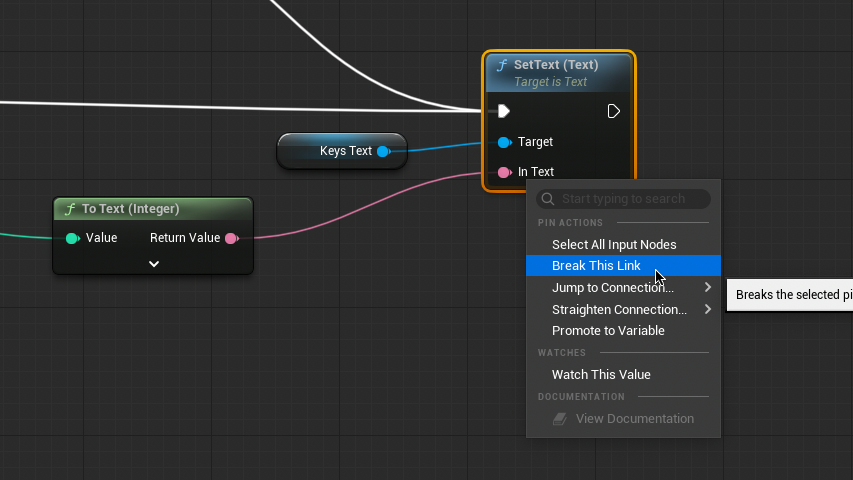
Right-click the In Text pin of the Set Text node and select “Break This Link”.
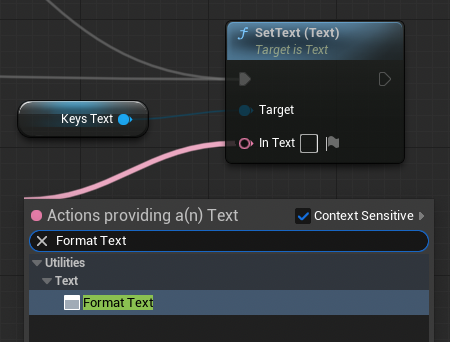
From the In Text pin drag and release to select “Format Text”.
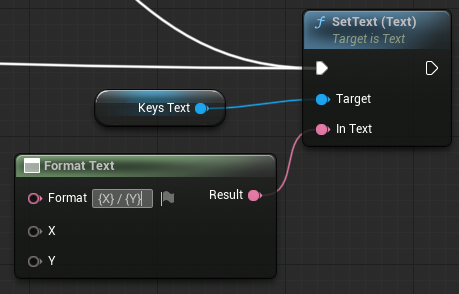
In the new node, enter “{X} / {Y}” into the format . This will tell Keys Text how to display multiple data inputs.
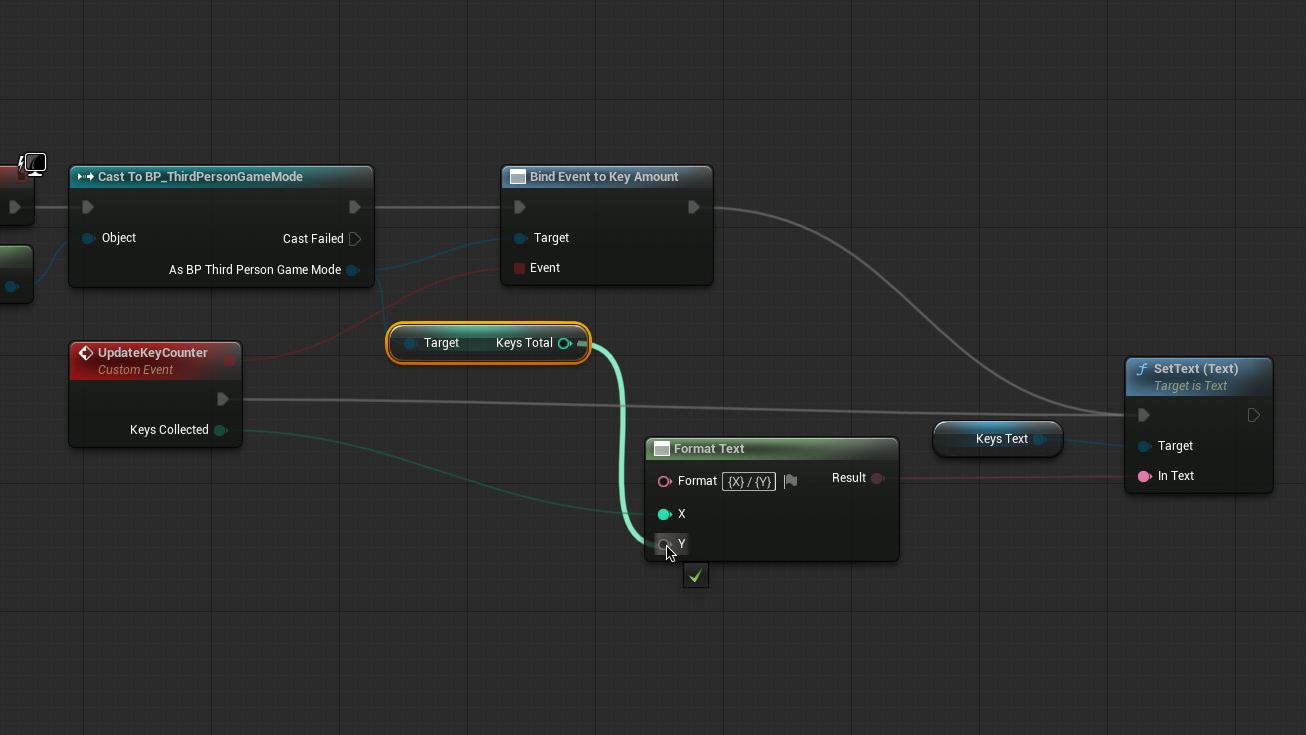
Connect Keys Collected from the UpdateKeyCounter node to X and Keys Total to Y of the Format Text node.
Your Event Graph should look like this. Hit Compile and test. Your HUD should now display the both the total amount of collectables in the scene at the start of play and the amount picked up by the player.
Now we can create our unlockable door.
We are going to use the regular door blueprint we created in the last tutorial as a base for our unlockable door. In the Content Drawer, right click the “BP_Door” and select Duplicate. Rename the duplicated door to “BP_LockedDoor” and double-click to enter the Event Graph.
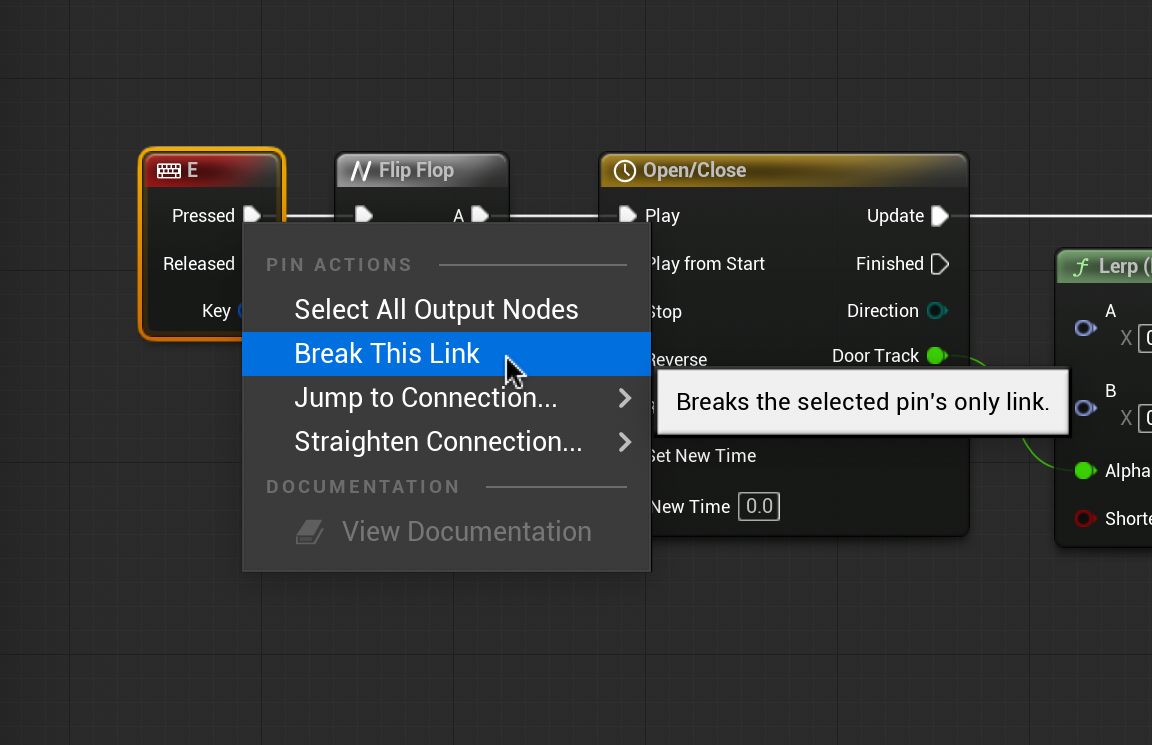
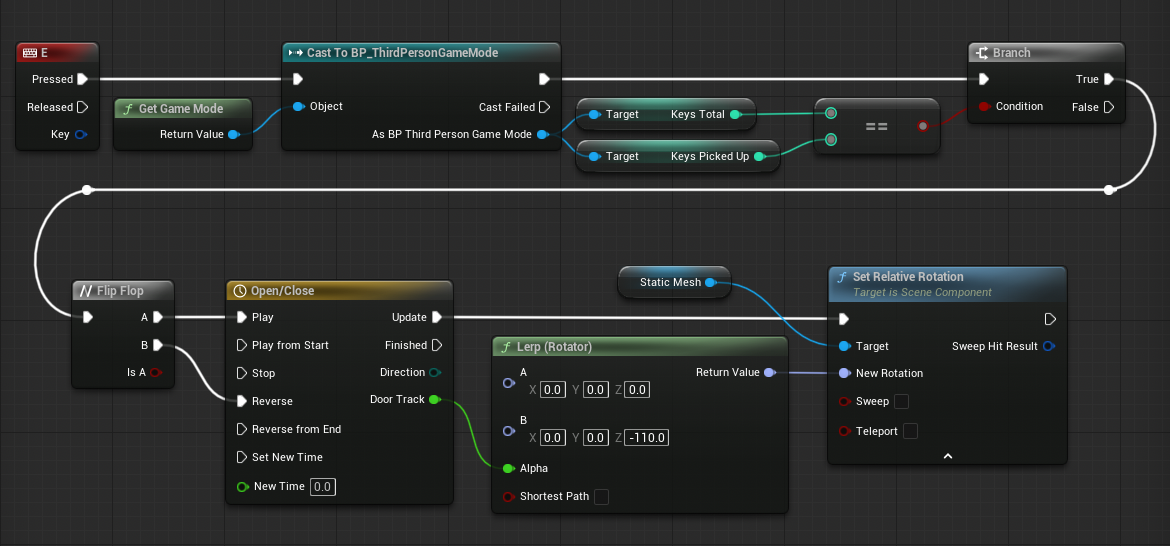
Right-click the pressed output of the “E” Input node and select “Break This Link”. Drag the separated chain to the side, we will need it later.
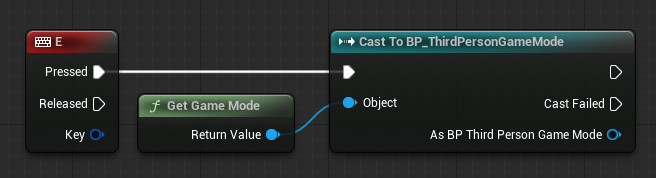
We need to get information about the items Collected and items Total from different blueprints. Drag from the “Pressed” output and release. Cast to “BP_ThirdPersonGameMode” and add Get Game Mode to the Objects input. The Event Graph should look like the image above.
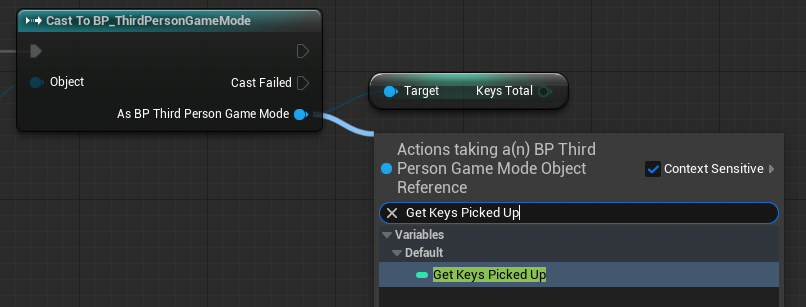
From the blue, bottom-right arrow of the new Cast node, drag and release. Type and select “Get [Items] Total” and “Get [Items] Picked Up”.
Drag and release from either new node. Type and select “Equal (==)” and connect the other node. This will activate the chain when the total items and items collected are the same amount.
Create a branch node by holding “b” and left-clicking a blank area of the Event Graph. Connect to the Equals node output to the Condition pin of the Branch node, and the Cast to BP_ThirdPersonGameMode node to the Branch node as shown above. We can now reconnect our door opening chain to the “True” output of the new node.
Your Event Graph should look like this. Compile and test. The locked door should only open when all keys have been collected.
The first step to creating a lockable door is to create a regular unlocked door. In this lesson, we will make a door that we can open and close with a key press.
First, we need to prepare our door. Search the Content Drawer for “SM_Door” (we can change the door’s static mesh later) and double-click to open the the Static Mesh editor.
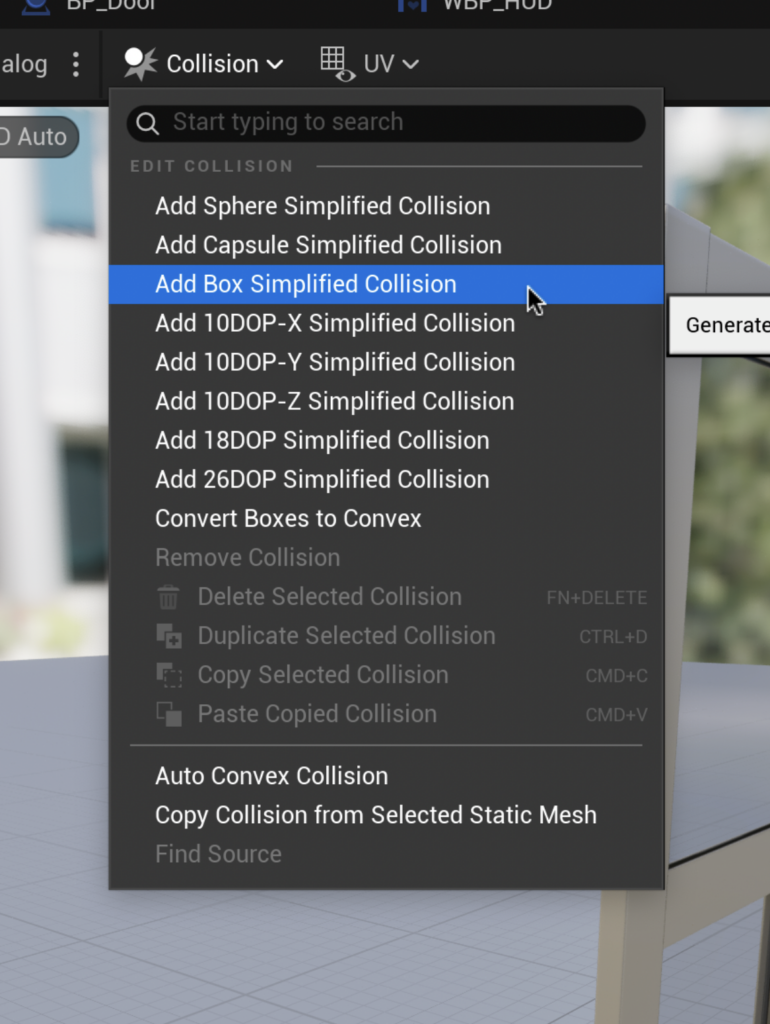
Click Collision > Add Box Simplified Collision. This creates a simple cube around the door preventing the player character from walking through.
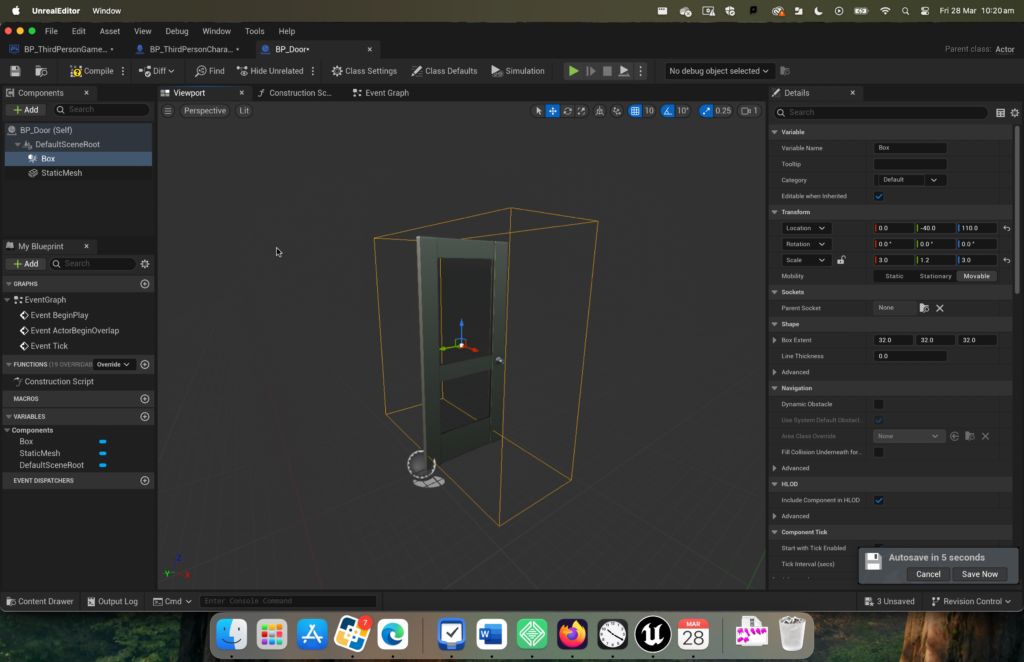
Return to the Content Drawer, create a new blueprint called “BP_Door” and set it to Actor. In the components menu on the left, add a Static Mesh and Box Collision. Set the static mesh to SM_Door and scale the box collision to surround the space in front and behind it. Open up the Graph Editor.
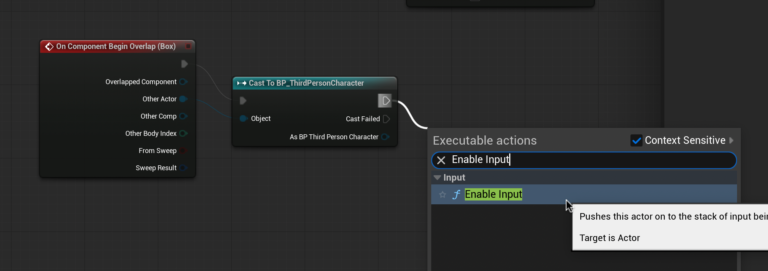
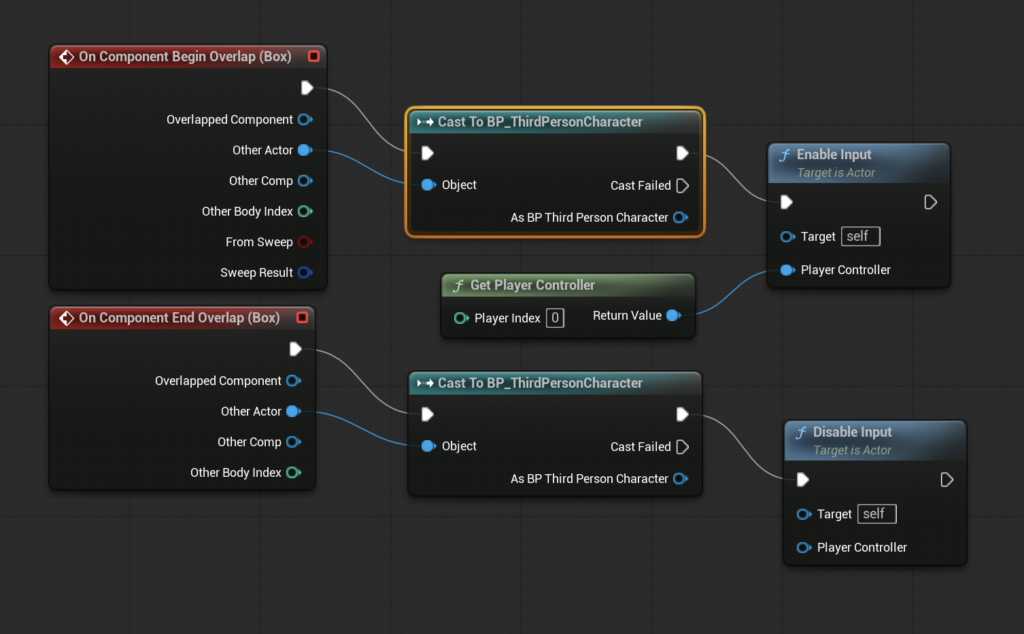
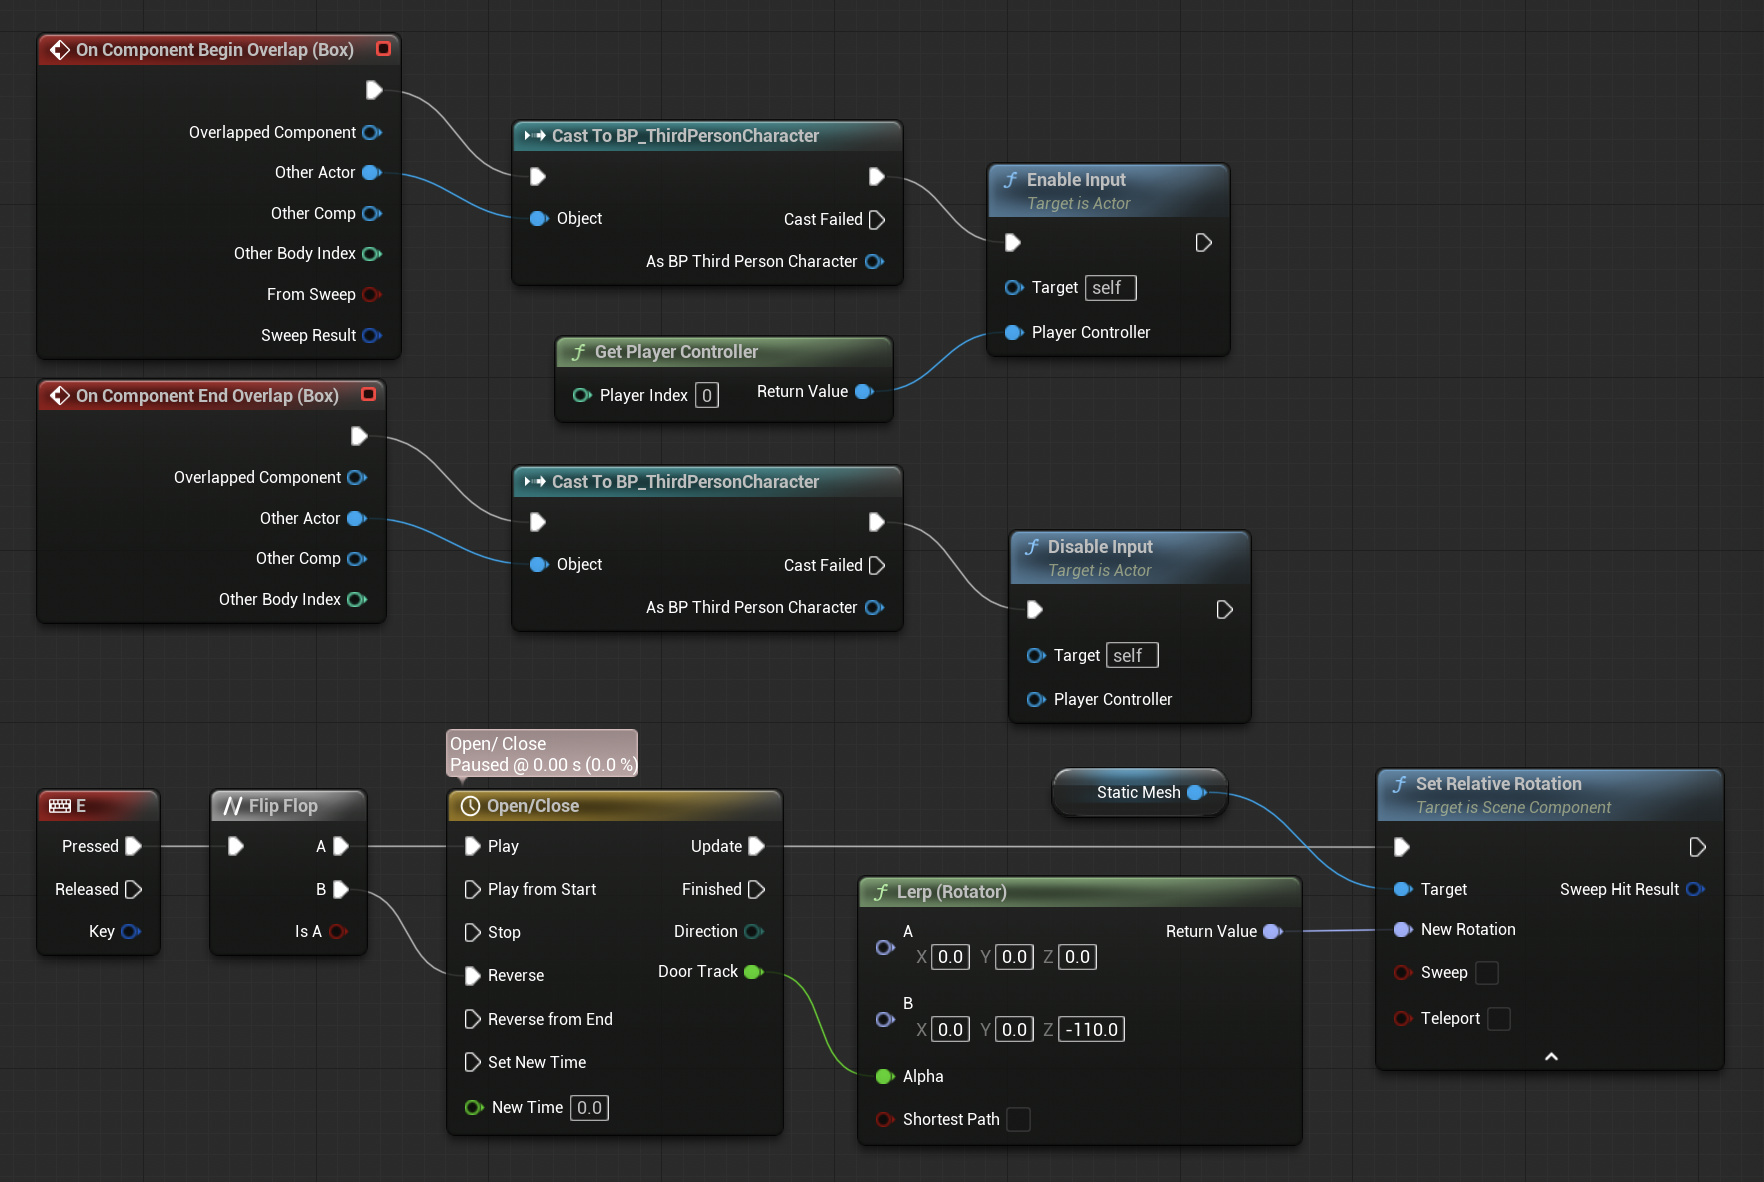
In the Components panel on the left, right click your Box Collision and add two events – OnComponentBeginOverLap and OnComponentEndOverlap.
For both of these new event nodes drag and release from the top-right white arrow, type and select “Cast to BP_ThirdPersonCharacter”
Now we need to enable player control of the door when they are inside the collision box.
On the OnComponentBeginOverlap node Drag and release from the top right white arrow of the Cast to BP_ThirdPersonCharacter node. Type and select “Enable Input”.
Do the same for OnComponentEndOverlap, except this time, type and select “Disable Input”.
From the Player Controller arrow of the Enable Input node, drag and release. Type and select “Get Player Controller”.
Click compile. Your Event Graph should look like this.
Now that we have enabled player controller input, we now need to tell the door what to do when it receives a command.
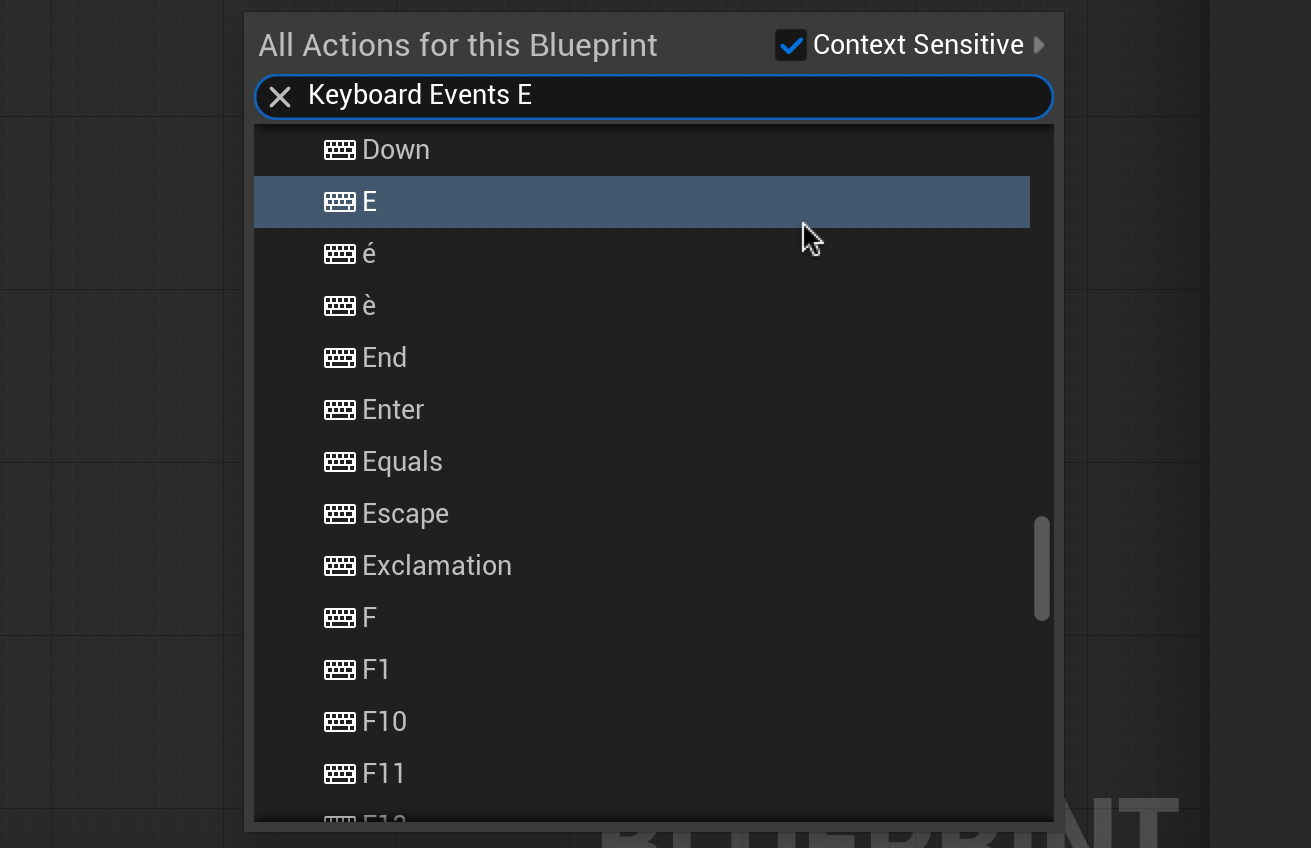
Right-click a new blank area of the BP_Door Event Graph, Type and select “Keyboard Events E”.
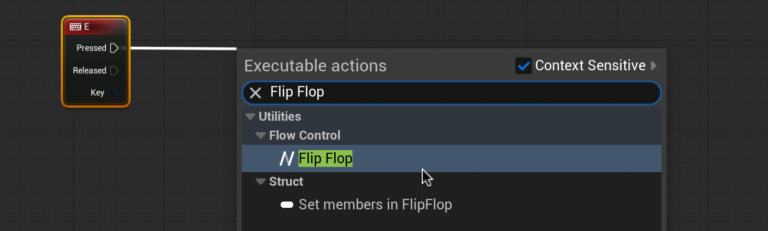
Drag and release from the “Pressed” arrow of the new node. Type and select “Flip Flop”.
A Flip Flop node allows us to switch between two different states. Drag and release from the “A” arrow. Type and select “Add Timeline”. Connect the “B” arrow of the Flip Flop node to “reverse” in the timeline node. This makes B do the opposite of what A does (A will be opening the door, therefore B will close the door).
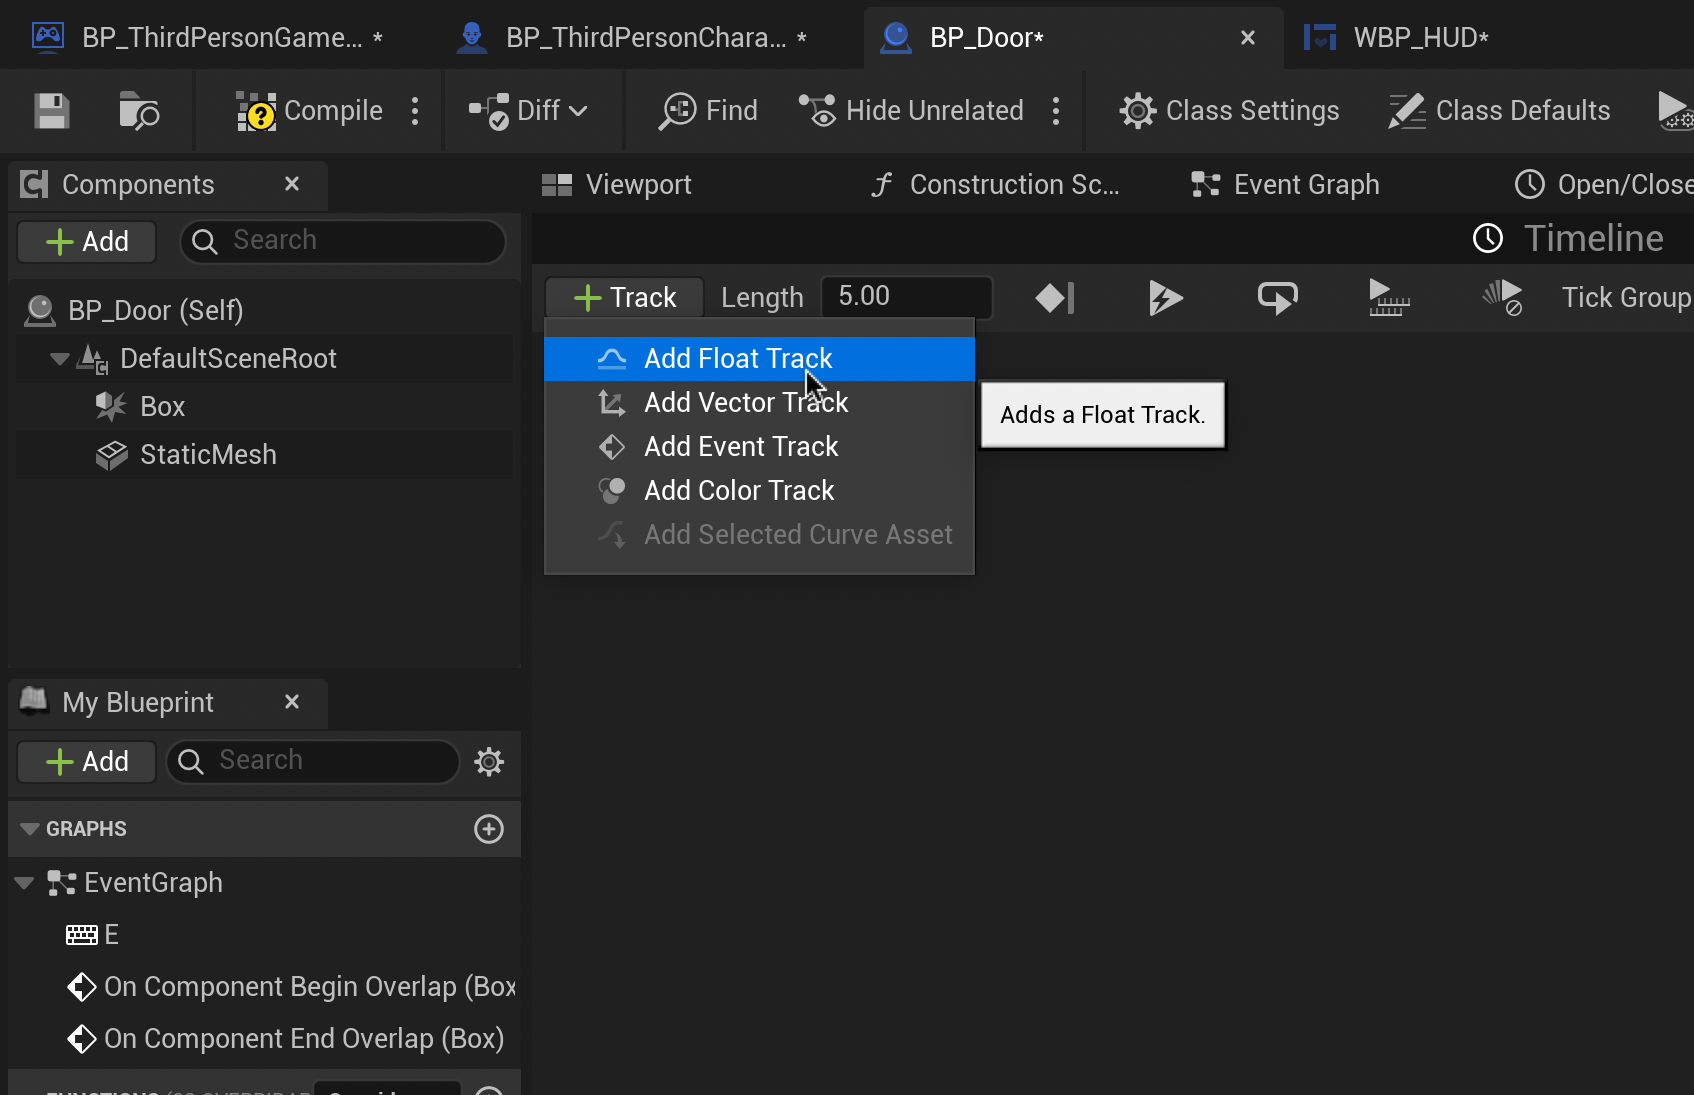
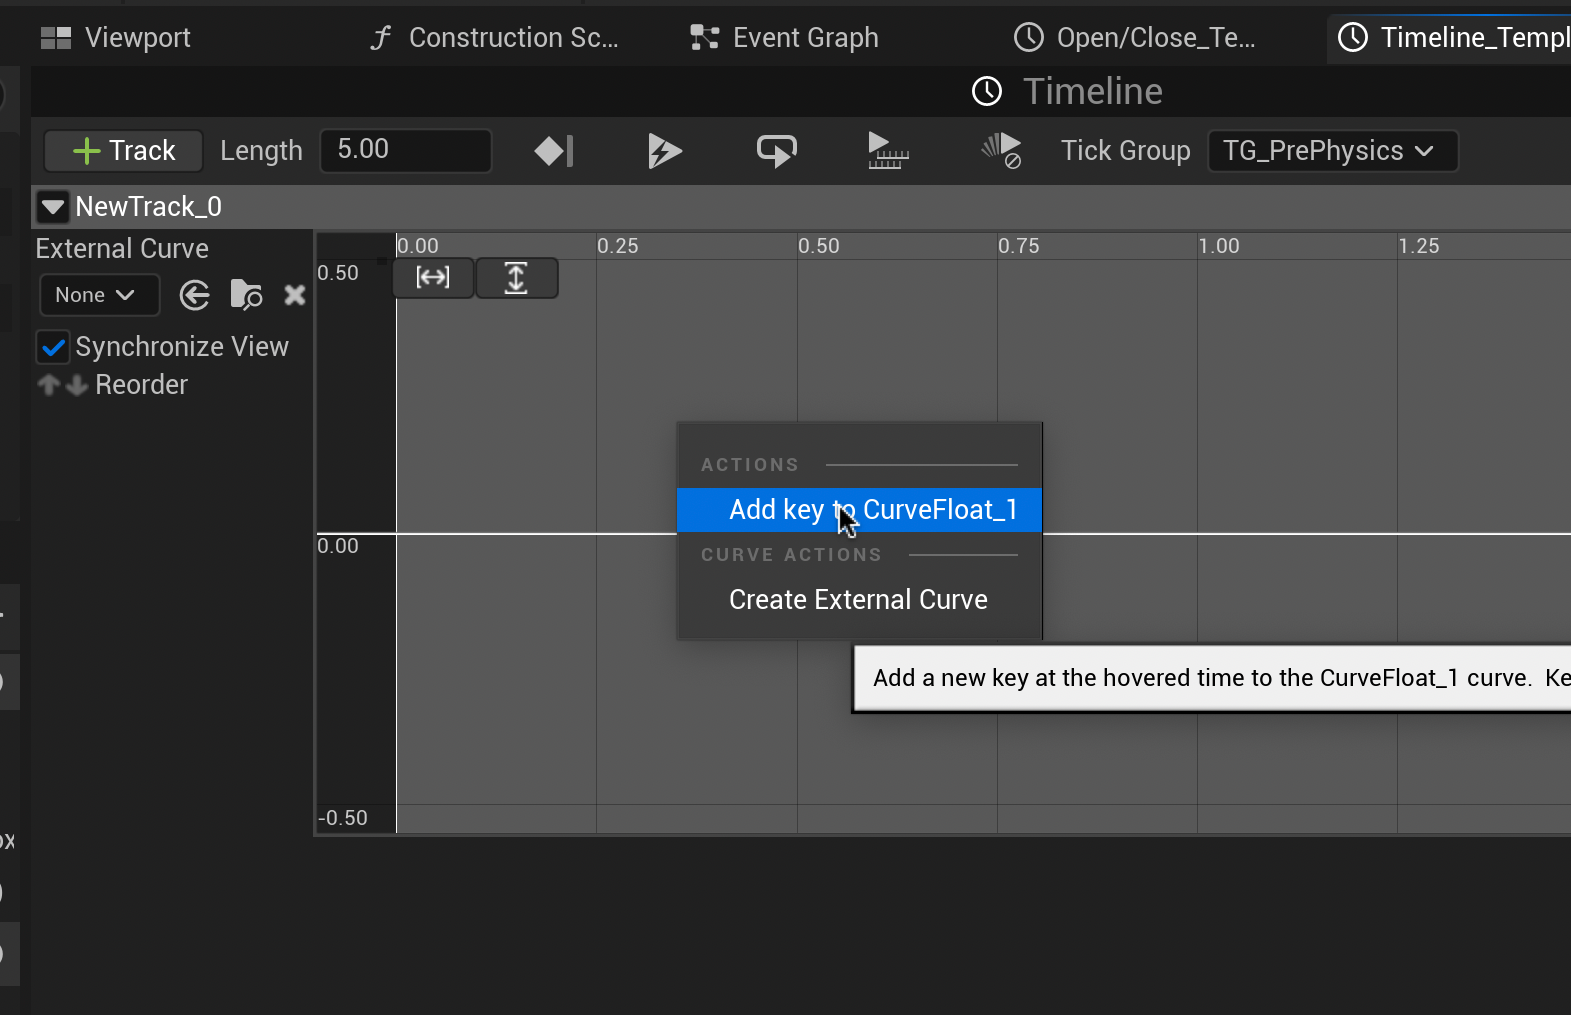
We now need to set the timing for our door to swing open. Double-click the Timeline node to enter it. Click “+ Track” to add a new Float Track.
Right-click the new track and select “Add key to Curve Float” twice.
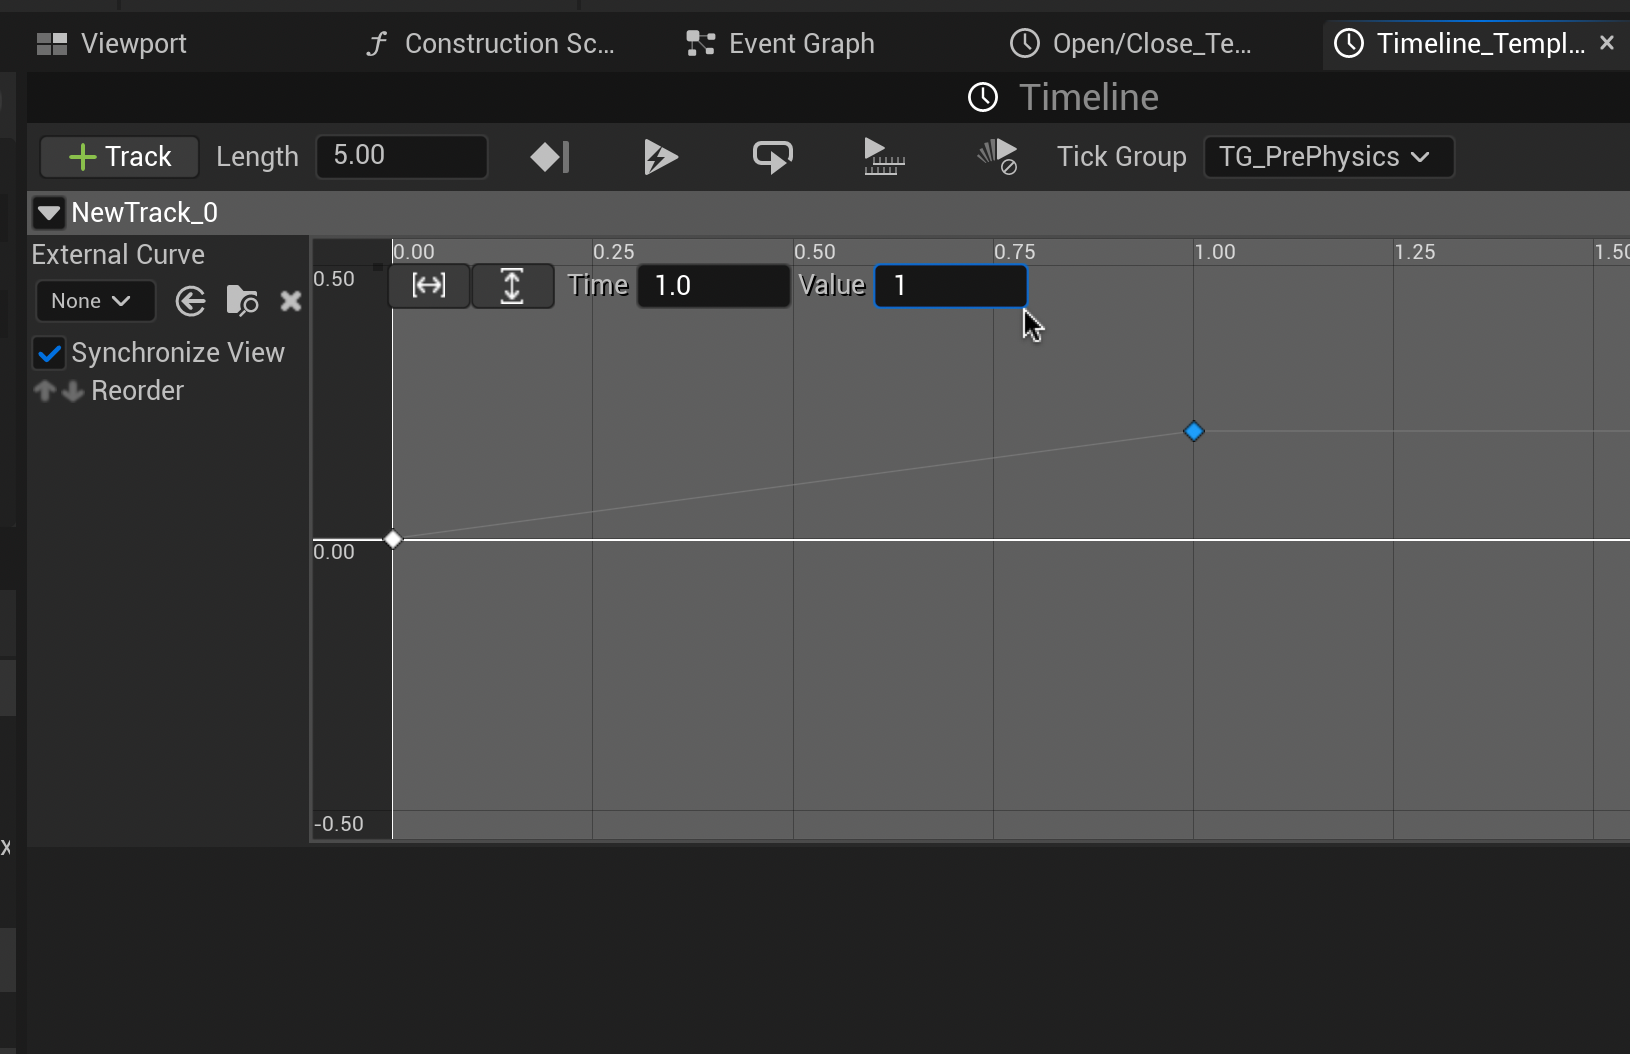
Select each key to change their Time and Value. Set the first key to a Time and Value to “0”. Set the second key’s Time and Value to “1”. Return to the Event Graph.
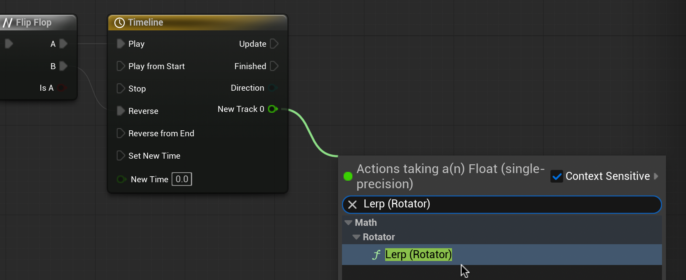
From the Timeline node, drag and release. Type and select “Lerp (Rotator)”.
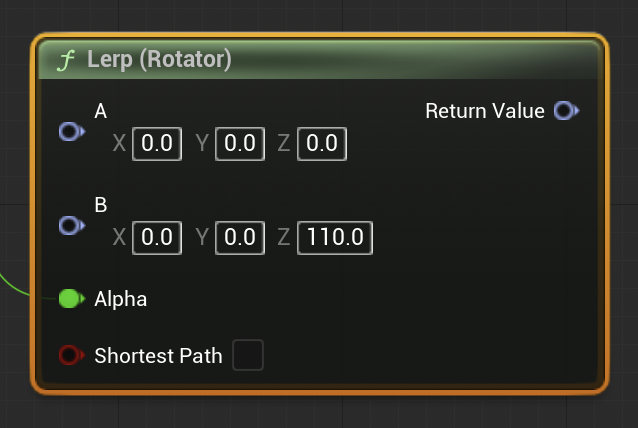
The Lerp Rotator node allows us to set the two rotation states our timeline will switch between. For now, let’s set the “B” state Z value to 110. We can adjust this number to fine-tune how much our door opens later.
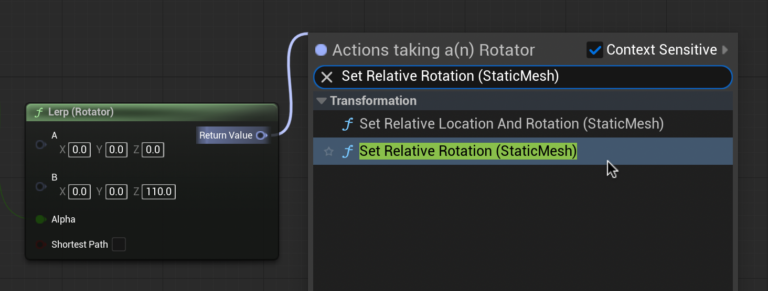
Now we need to tell the door what to rotate. Drag and release the return value, type and select “Set Relative Rotation (StaticMesh)”.
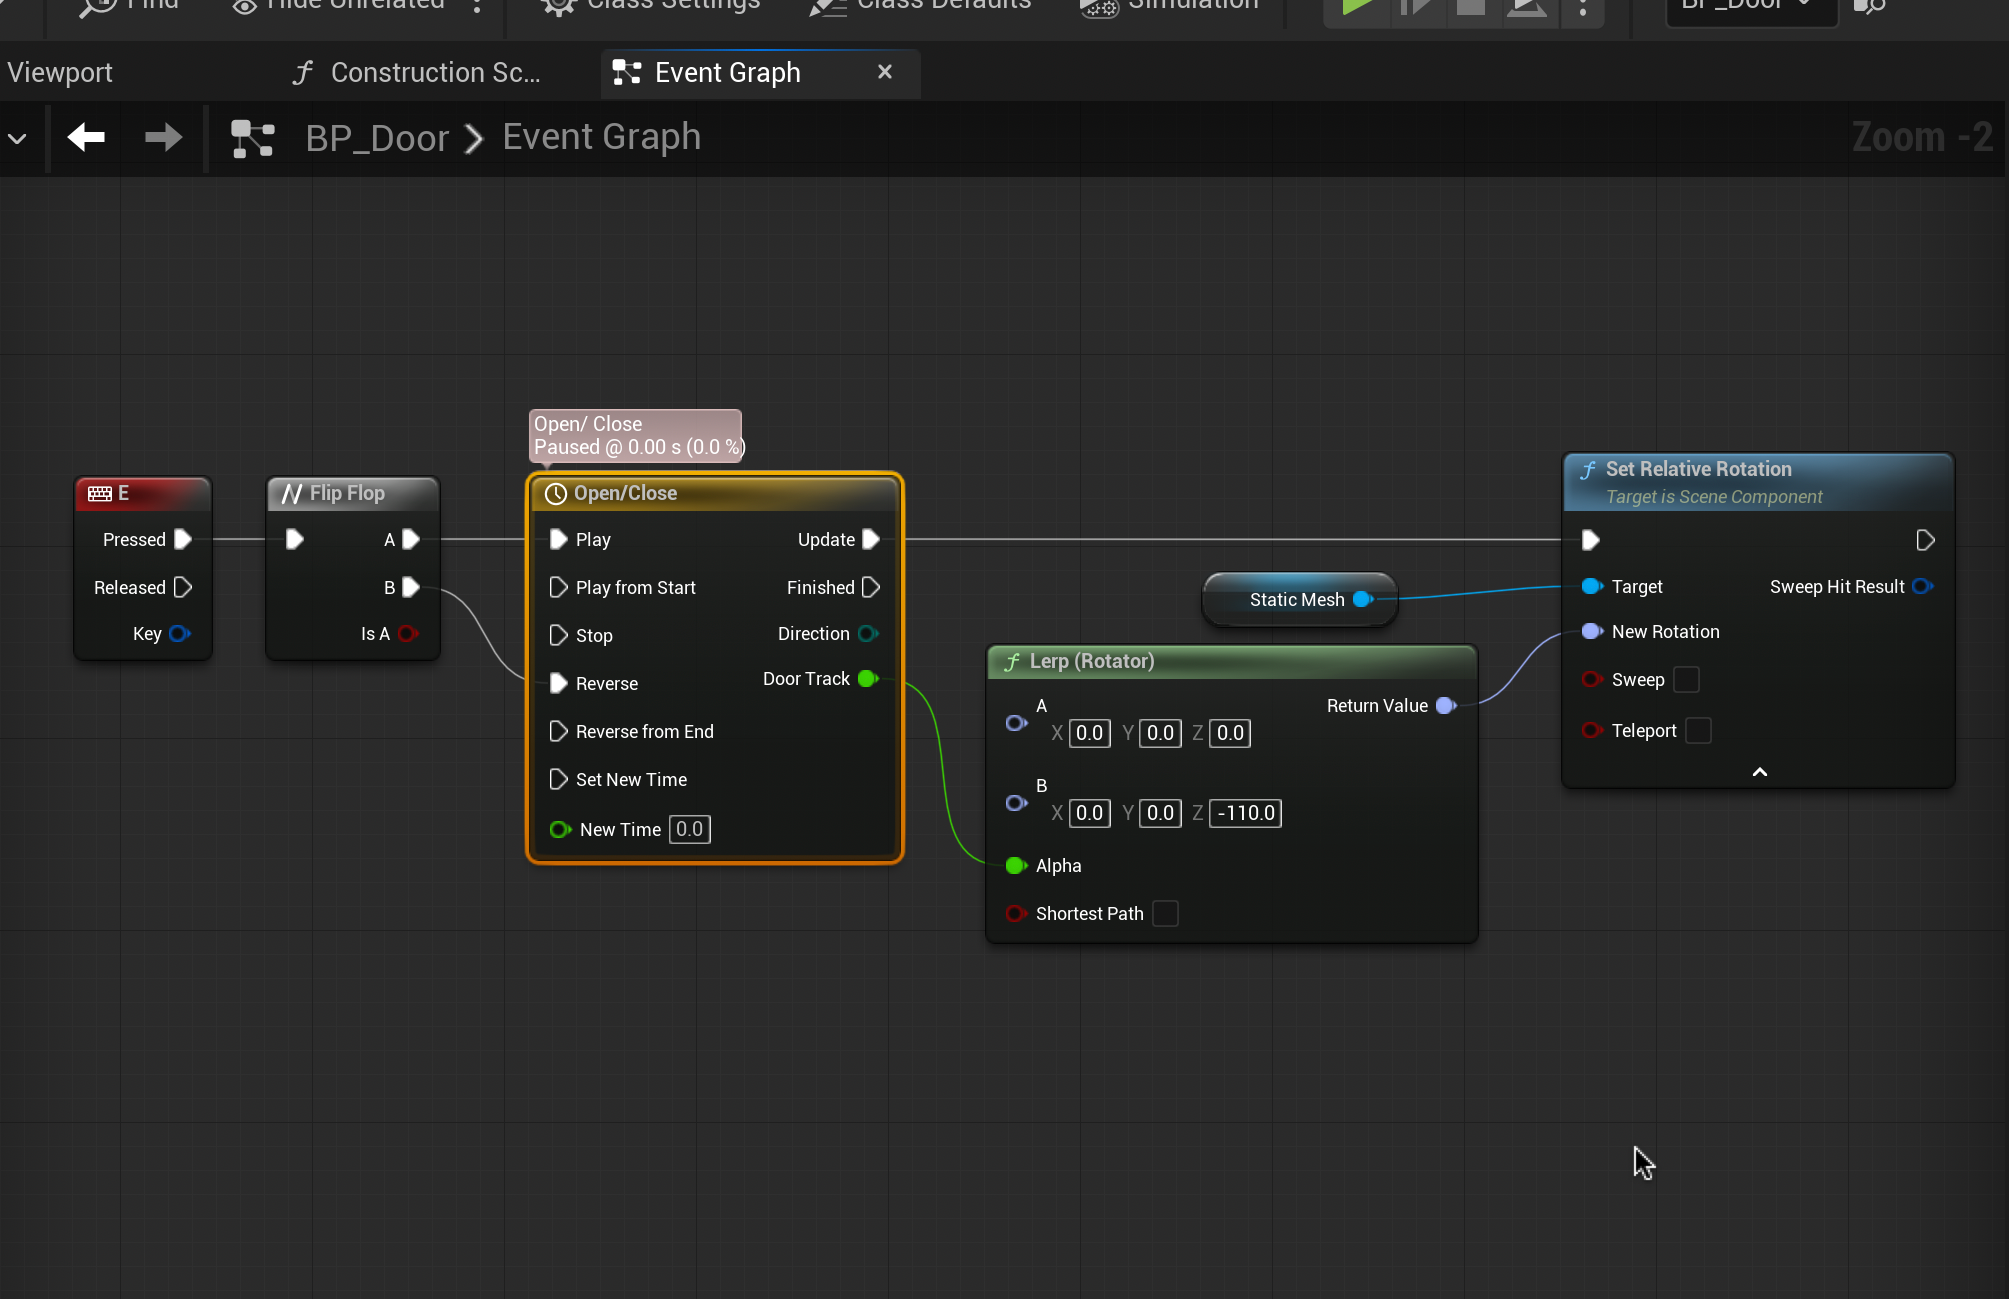
Finally, connect the Update arrow of the Timeline node to the top left arrow of the Set Relative Rotation node.
Your completed Event Graph should look like this.
Compile and test your door by walking up to it and pressing “E”.
Now that we are able to track our number of collectables picked up we need to visually notify the player how many they have collected in a Heads Up Display (HUD). A HUD is the information we see on the screen about our characters condition, such as health, money, or where they are on a minimap.
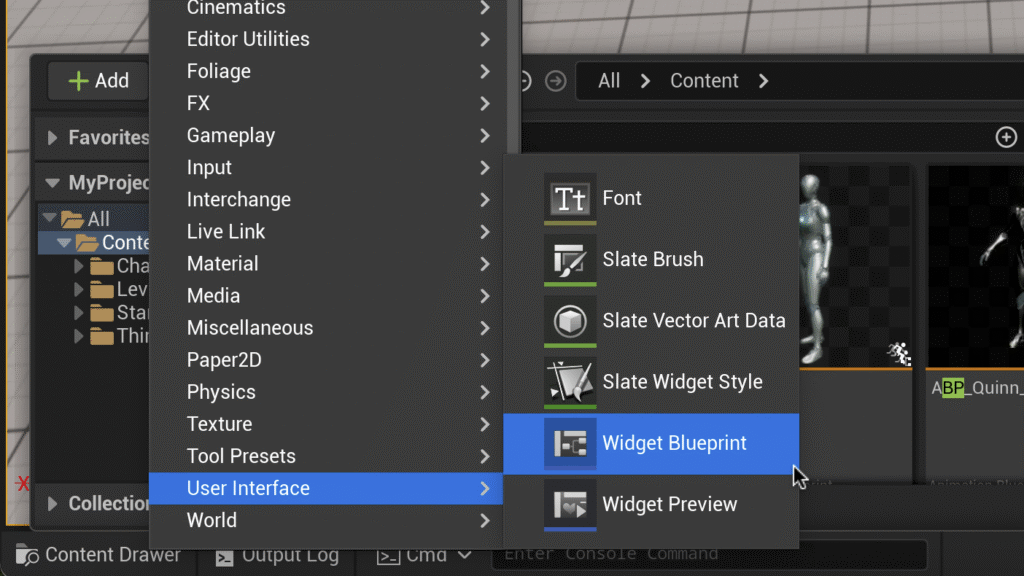
In the Content Drawer, Go to Add > User Interface > Widget Blueprint. Name it “WBP_HUD” and double click to enter the Widget Blueprint.
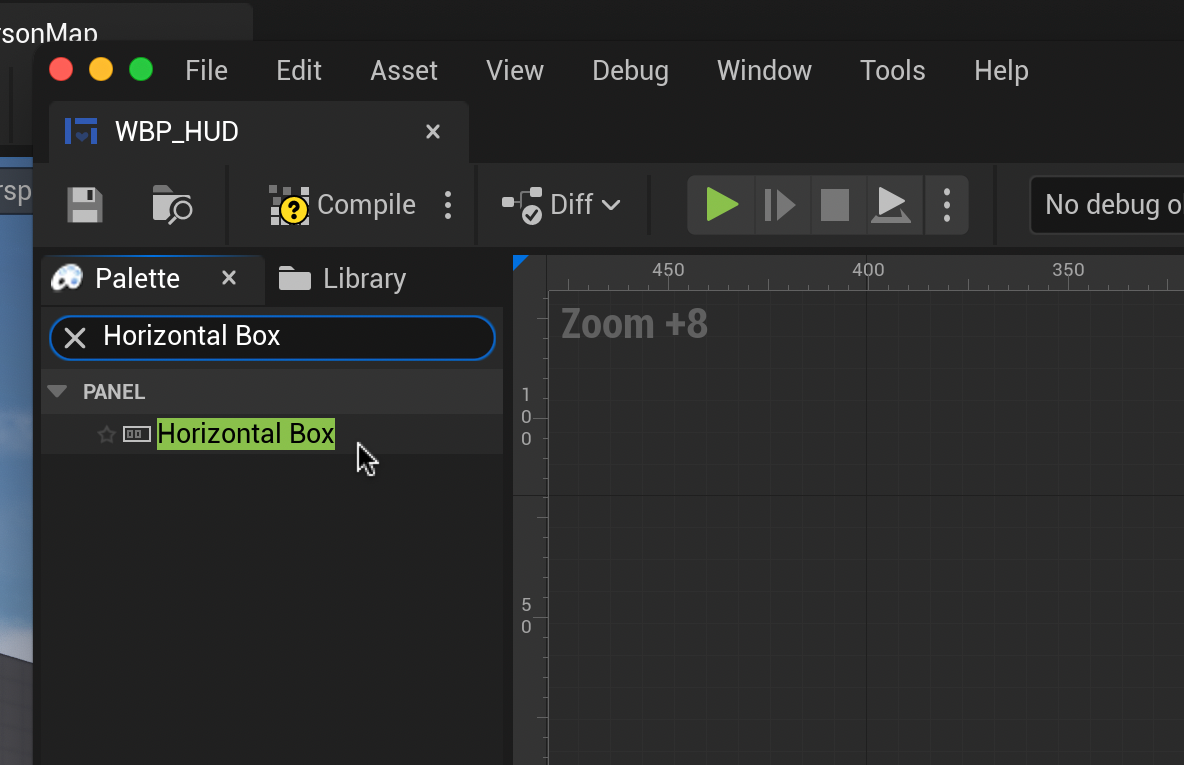
In the Widget Designer, type “Horizontal Box” in the palette panel on the left and drag into the design window.
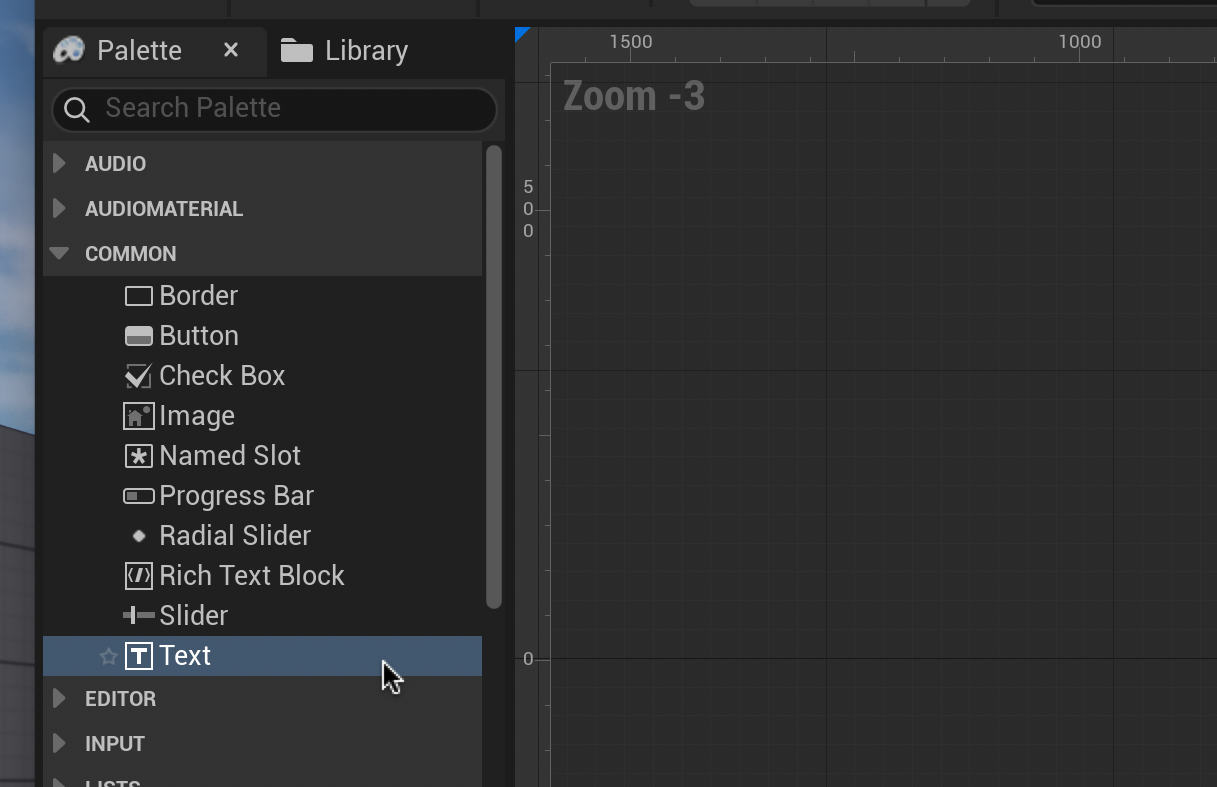
Press the “x” to the left of the search field. Drag an image block and a text block from the Palette panel into the newly created Horizontal Box
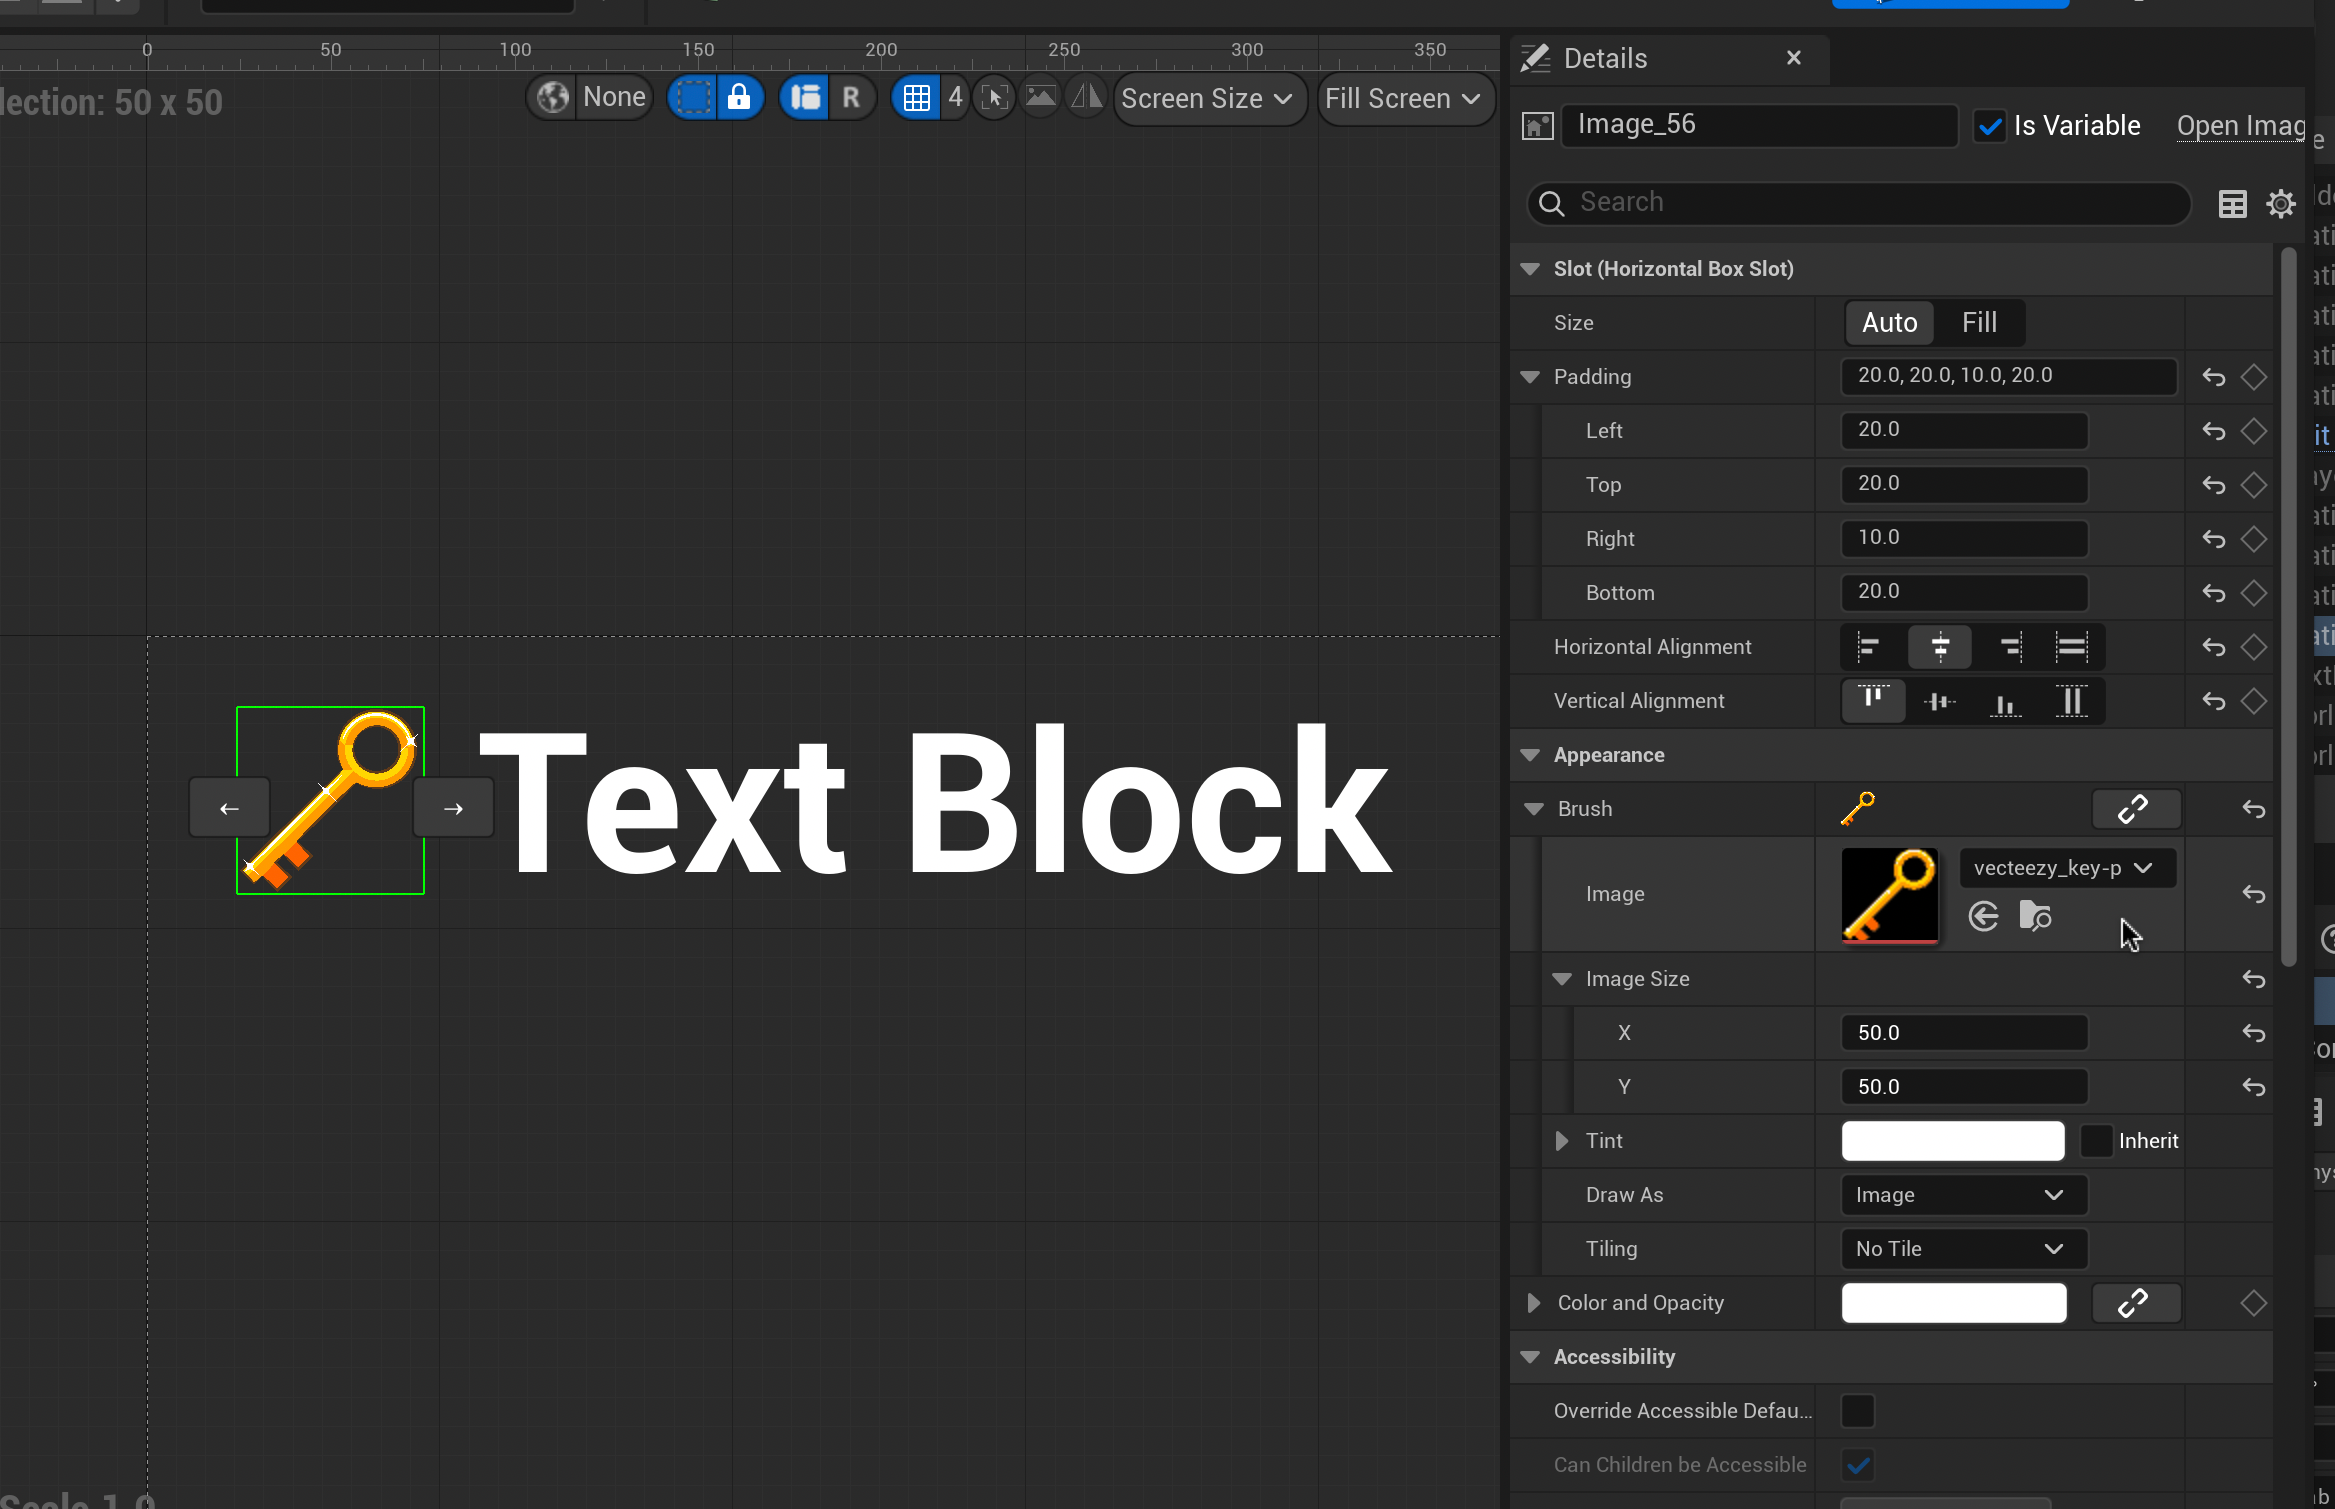
Select your Image Block. On the right-side in the Details panel use the appearance menu to set the Image Block’s display image under “Brush”. You will need to upload your image to your project first (Content Drawer > Add > Import to /Game…). You can also set the image’s size here by changing it’s X and Y.
Once you are happy with your image, set the padding and alignment of your collectable items in the Slot menu above to space your image away from the edge of the screen and textbox.
Feel free to use my presets displayed in the above image.
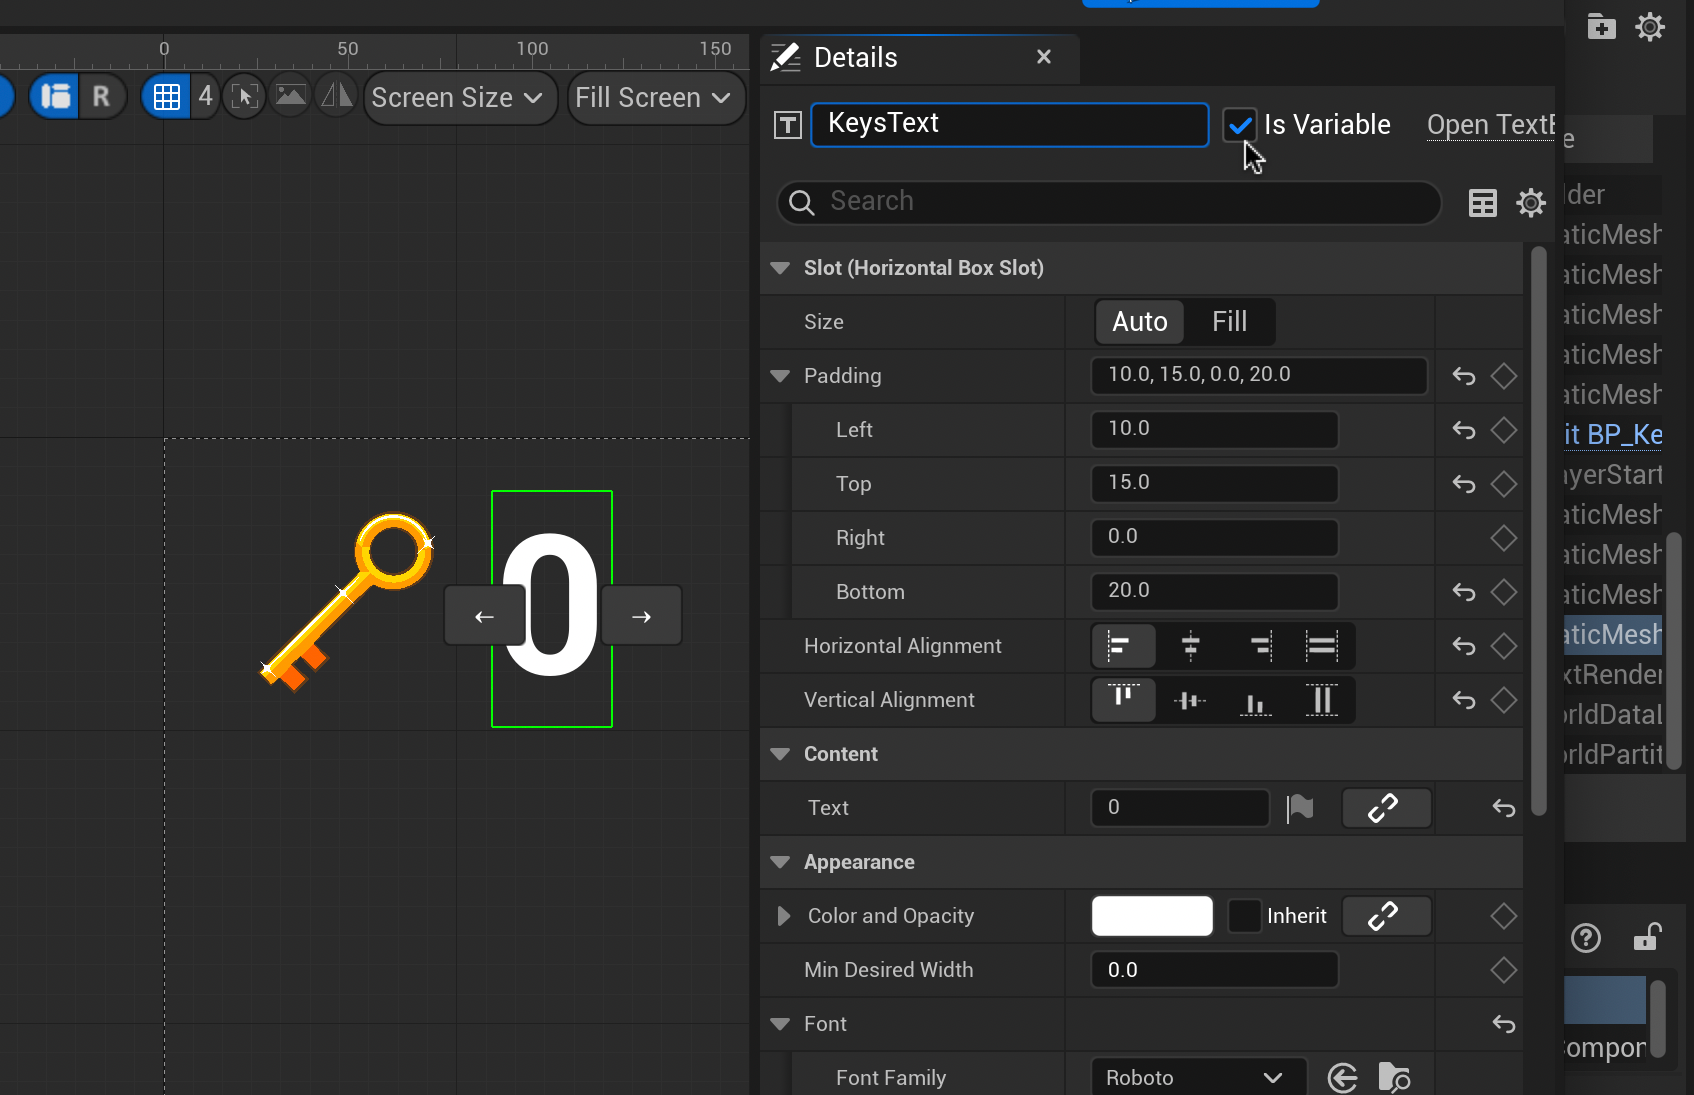
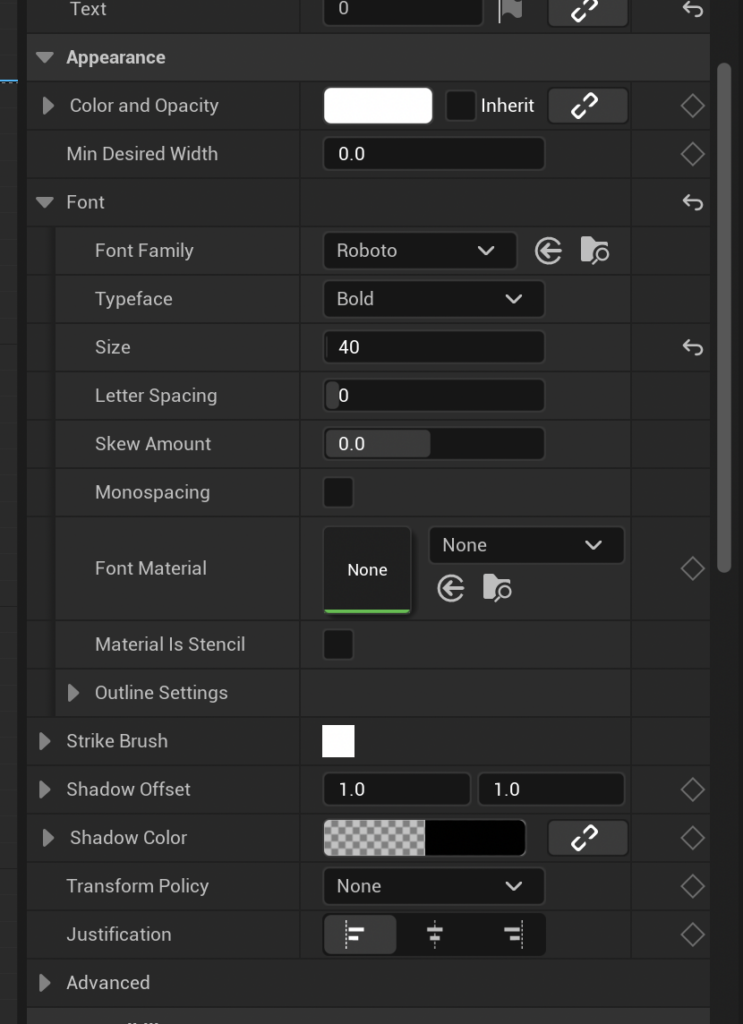
Now, select your Text Block. In the Details panel rename the Text Block to “[Item]Text” and tick “Is Variable”. In the content menu, change your default text to “0”.
Scroll down to the Appearance menu to change the text size and font to your preference. When you are happy with your section, set the Text Block’s padding and alignment as you did before with your image.
We now need to create an Event Dispatcher to communicate with the Widget. In the Content Drawer search for “BP_ThirdPersonGameMode”. Double-click to open the Graph Editor.
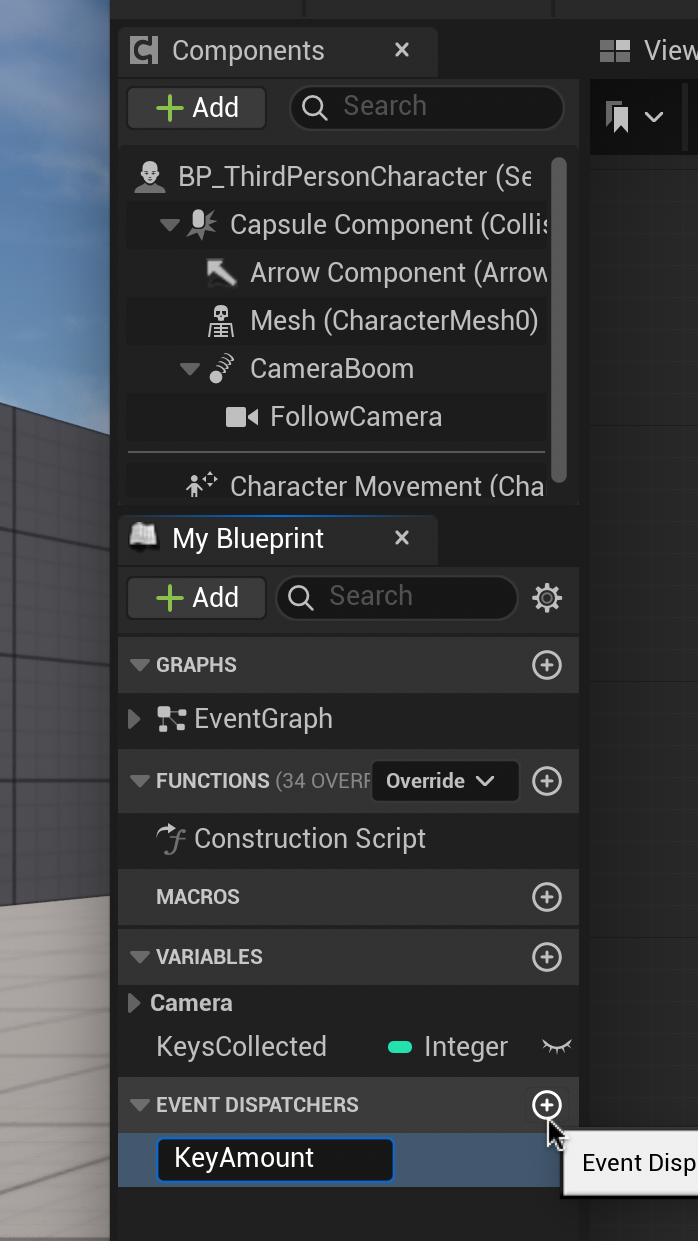
In the Components panel on the left, add an Event Dispatcher. Name it “[Item]Amount”.
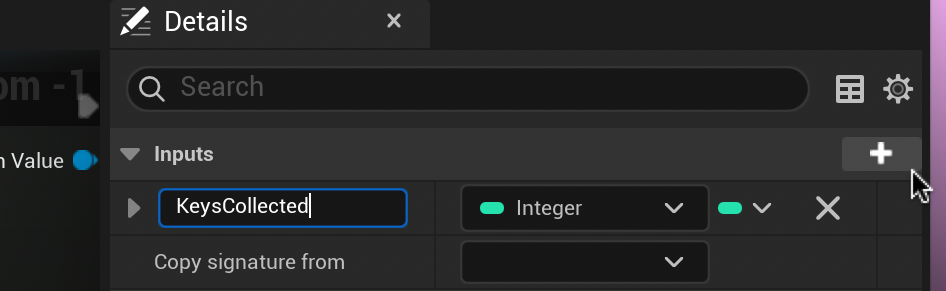
With our new dispatcher selected, go to the right Details panel and add a new parameter using the plus button. Change the name to “[Items]Collected” and change it into an integer.
Select and delete the Print String nodes we created before. This disables the pale blue numbers.
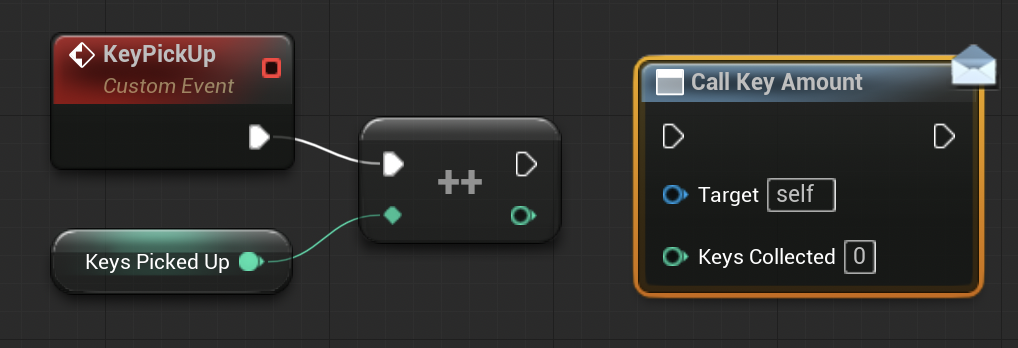
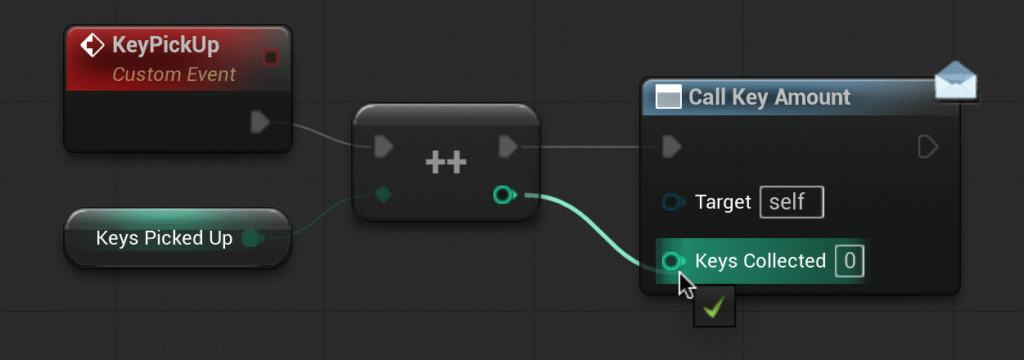
From the Event Dispatchers panel on the left, drag the [Item]Amount dispatcher into the graph editor and select “Call”.
Connect Call Key Amount to the Incremental Int node as shown (note the dull lines). Click Compile.
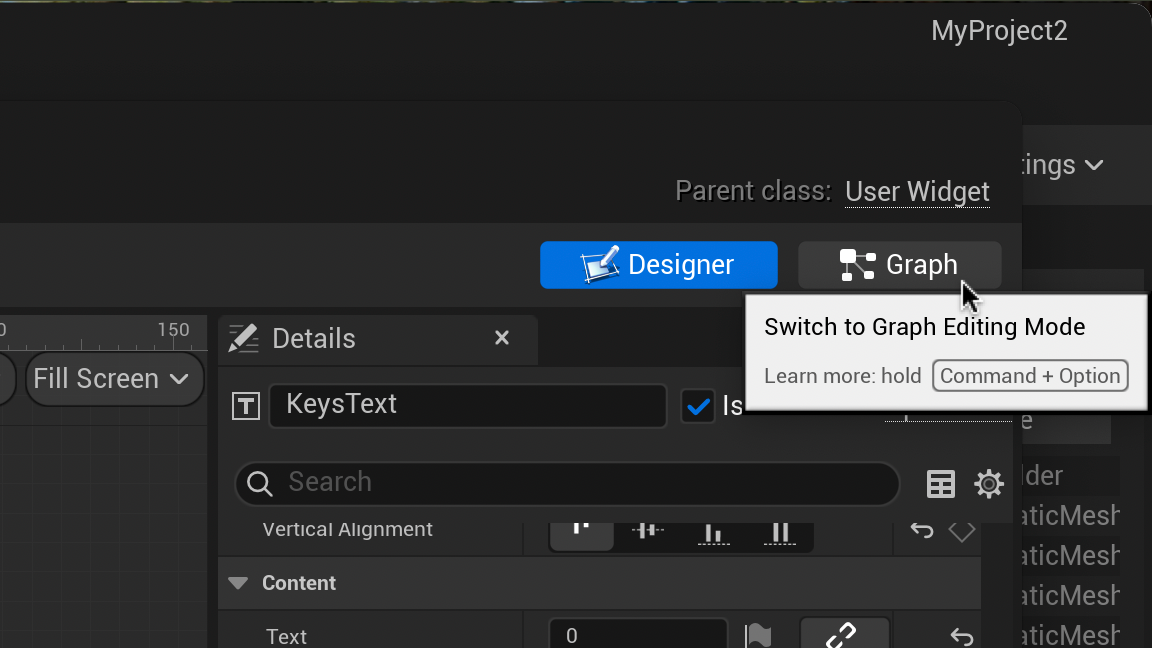
Let’s return to our Widget Blueprint and head to the Graph tab.
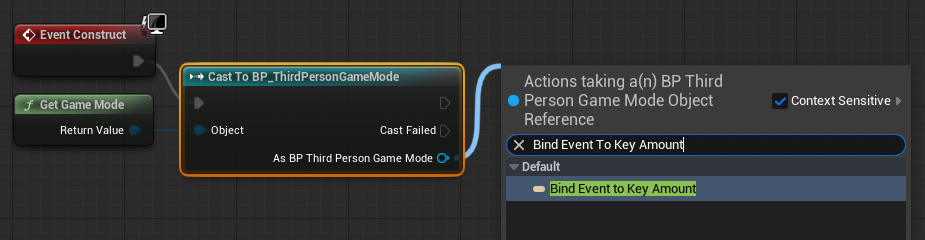
From Event Construct drag and release to type and select “Cast to BP_ThirdPersonGameMode”. From the Object pin of the new node type and select “Get Game Mode”.
From the Cast to BP_ThirdPersonGameMode node drag and release the As BP Third Person Game Mode pin. Type and select “Bind Event to [Item] Amount”
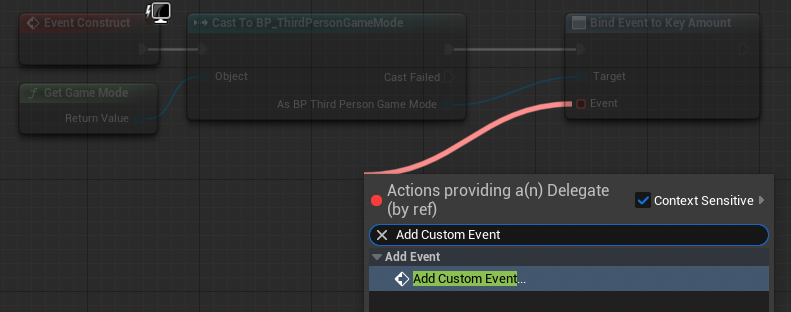
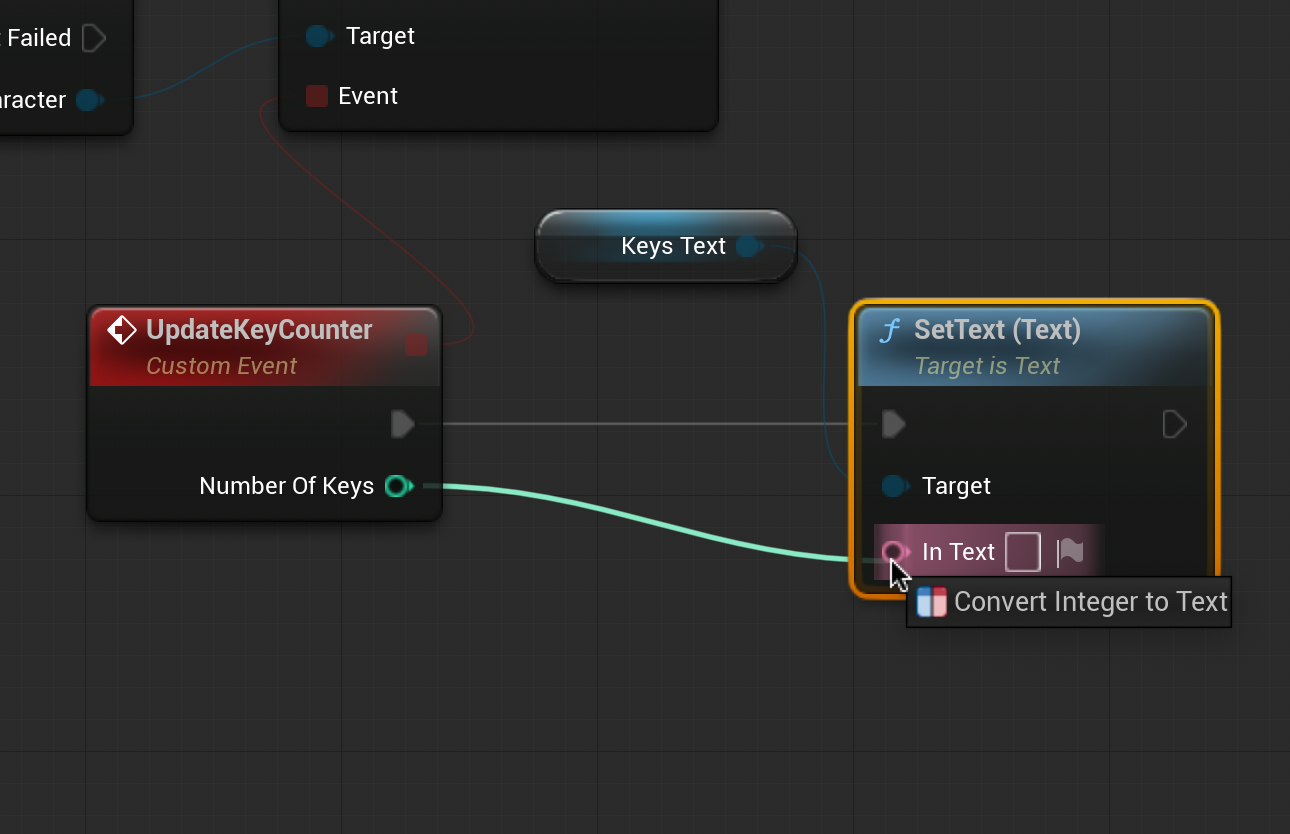
From Bind Event to [Item] Amount drag and release Event. Type and Select “Add Custom Event”. Name this event “Update[Item]Counter”.
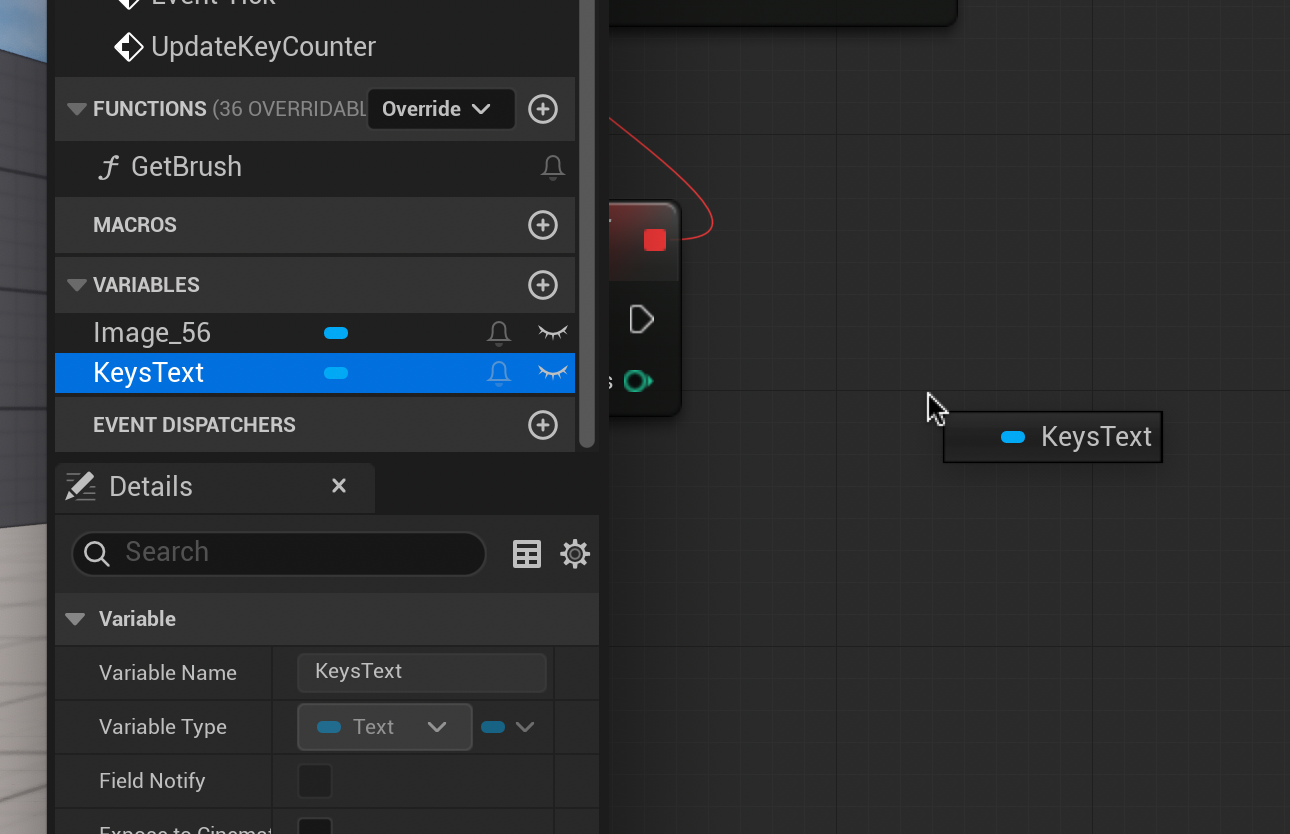
From the Variables Panel on the left drag out “[Item]Text” and select “Get Keys Text”
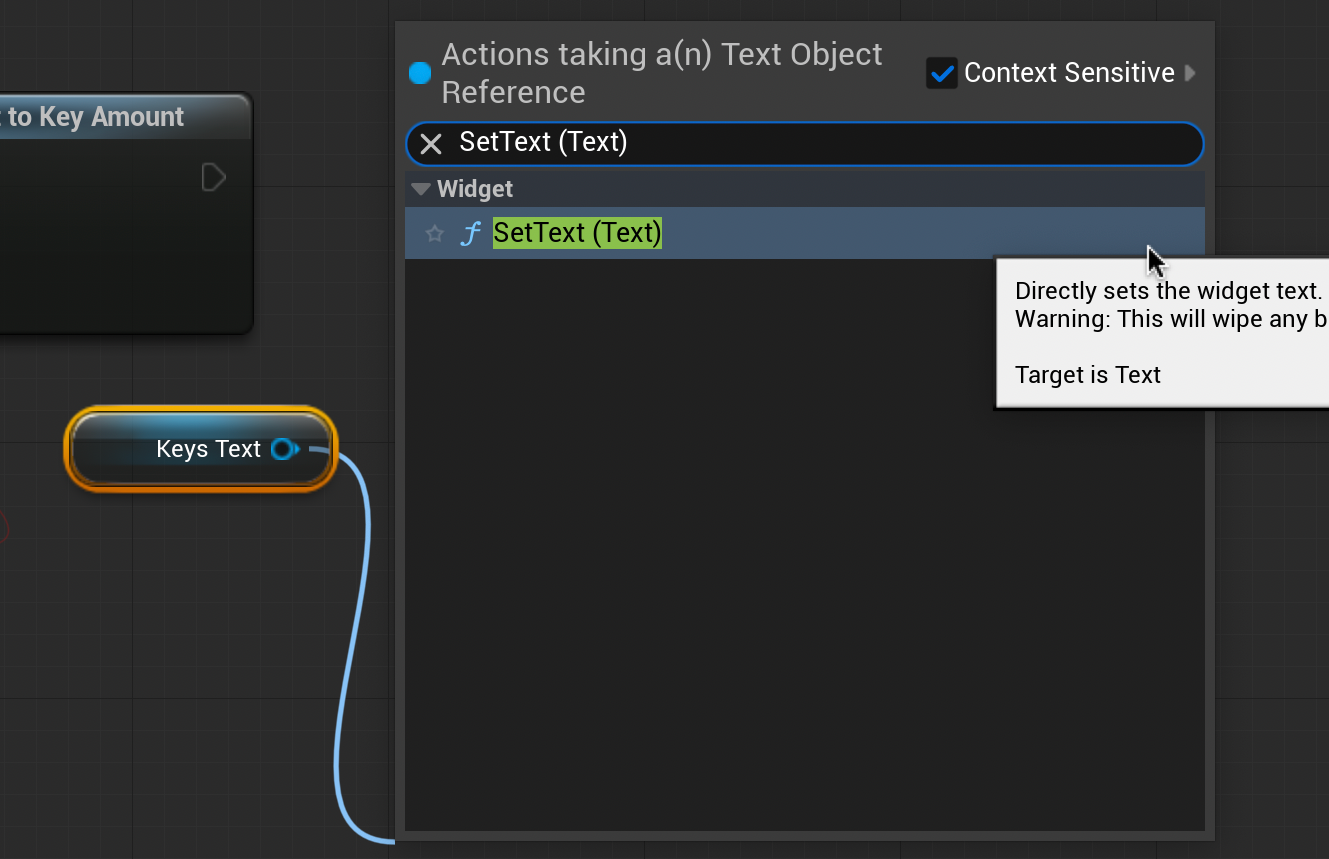
Drag and release from the [Item] Text node. Type and select “SetText (Text)”.
Connect the SetText node to the Update[Item]Counter as shown (note the dull grey line).
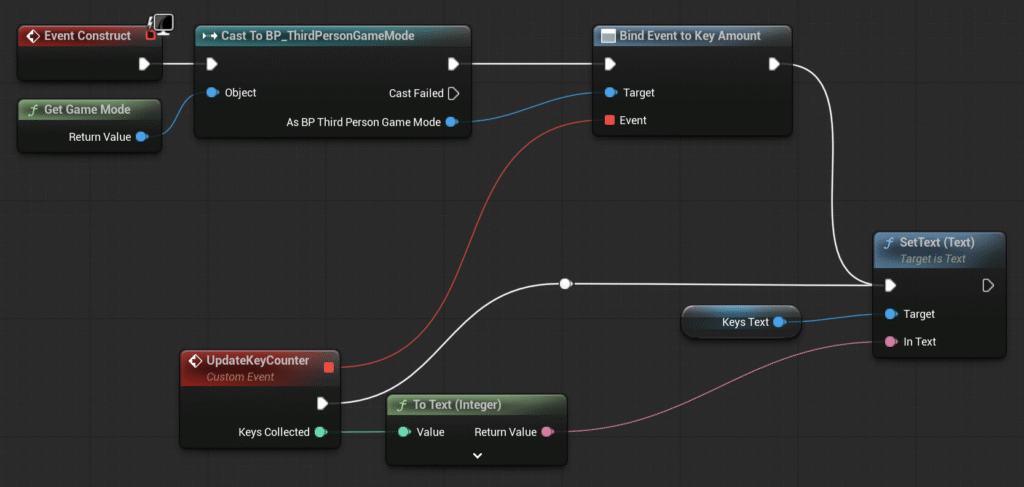
When completed, the WBP_HUD Event Graph should look like this. Click Compile.
Finally, we need to connect our HUD to the viewport. From the Content Drawer return to “BP_ThirdPersonGameMode” and double click to open. Click “Open full Blueprint Editor”.
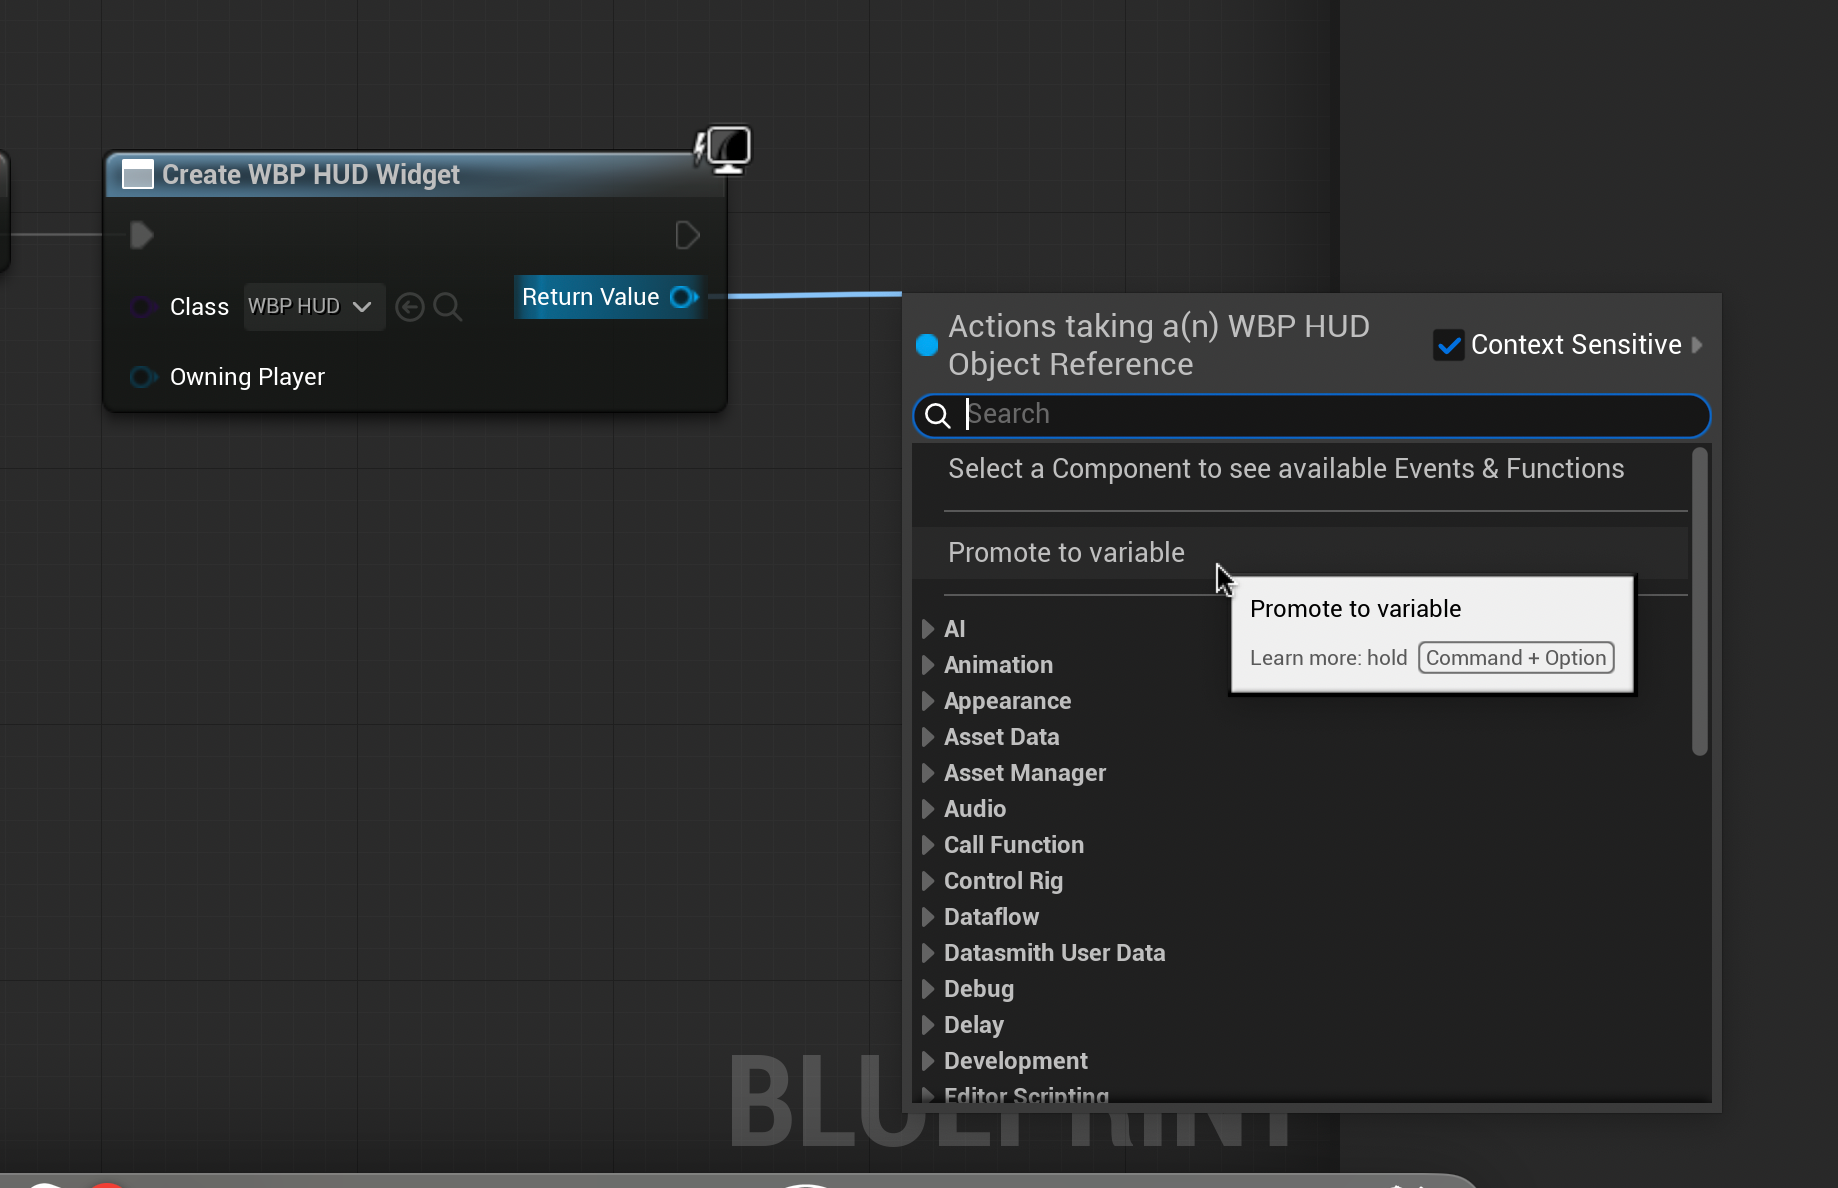
Right-click a blank area of the Graph Editor. Type and select “Event BeginPlay”. Drag and release from this node, type and select “Create Widget”.
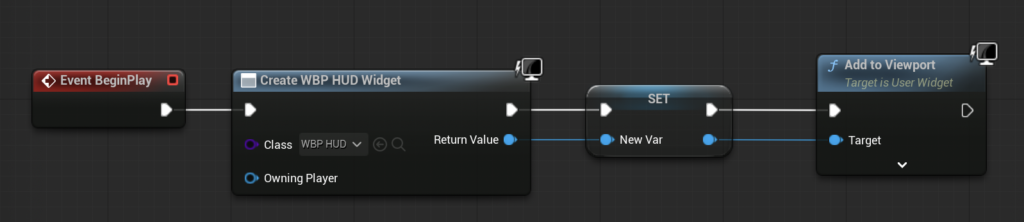
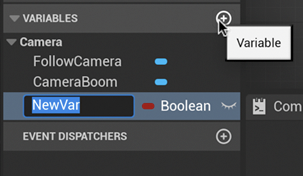
Change the nodes class to “WBP_HUD”. Drag and release the return value and select “Promote to Variable”. From the bottom right blue arrow of the new node, drag and release. Type and select “add to Viewport”
The Event Graph should look like this when you are done. Compile and test.
You should now be able to see an active counter in your top left corner of the screen that increases by one every time you pick up a collectable.
Last lesson we created our first collectable – we could walk up to it and pick it up, but other than disappearing it didn’t do anything. In this lesson, we will begin counting the collectables we pick-up.
When creating our collectable we created a new blueprint. This time we are going to alter an existing blueprint – our Game Mode blueprint. In the Content Drawer search and select “BP_ThirdPersonGameMode”.
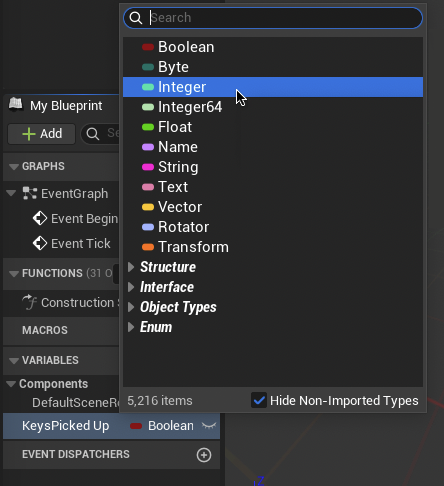
On the left side in the Variables panel, use the plus button to add a variable named “[items]PickedUp”. I called mine KeysPickedUp.
Change this variable from a Boolean to an Integer. This will make the variable track whole numbers.
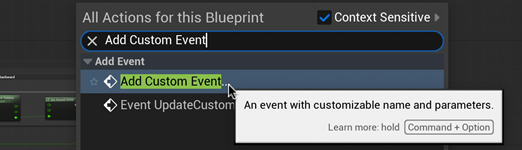
Right-click a blank space in the Event Graph. Type and select “Add Custom Event”. Name this event “[Item]PickUp”. Remember this name as you will need to use it later.
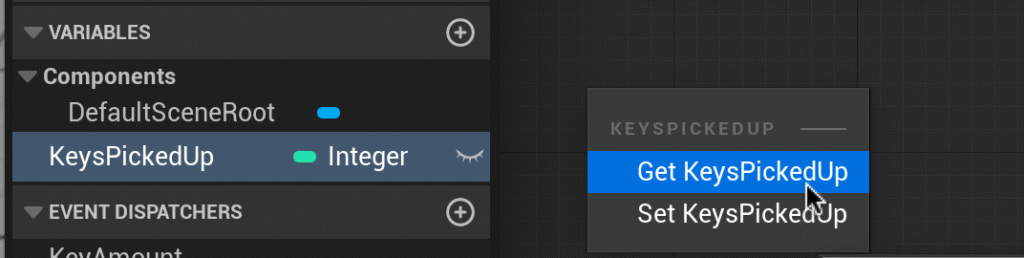
From the Variables menu on the left drag your Interger into the Event Graph and select “Get [Items]PickedUp”.
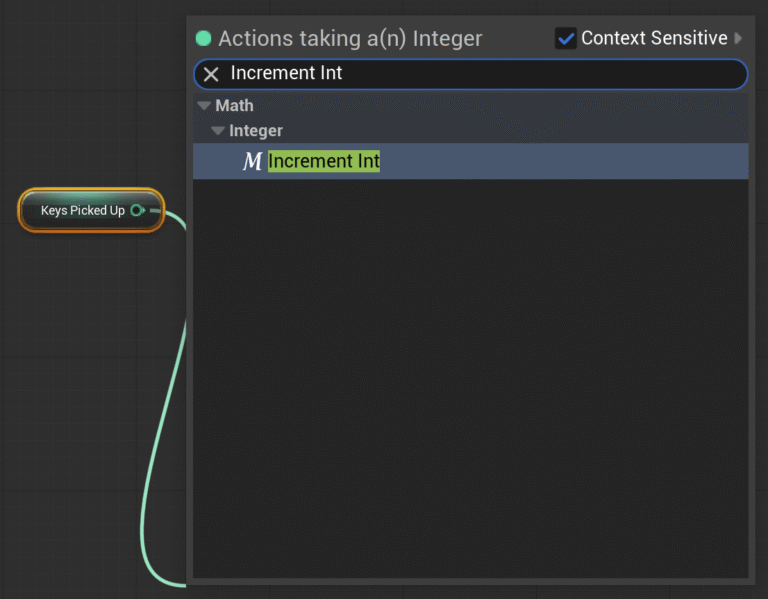
In the Event Graph, drag from the green arrow of the “[Items] Picked Up” variable and release. Type and select “Incremental Int”. This will increase our collectable count by one when activated.
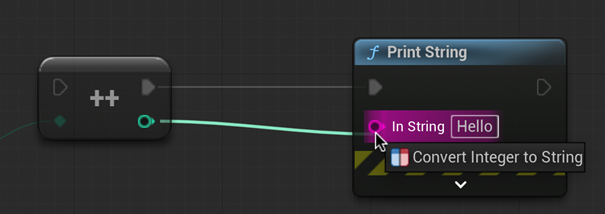
From the node we just created, drag the top arrow into a blank space in the event editor. Type and select “Print String”.
Connect the mint green arrow from the Incremental Int node to the magenta arrow of the Print String node.
Connect the top left arrow of the Incremental Int node to the white arrow of the “[Item]PickUp event”. When completed, our Event Graph should look like this.
Press Compile in the top left corner. We are now done with this blueprint. Let’s return to our collectable object blueprint.
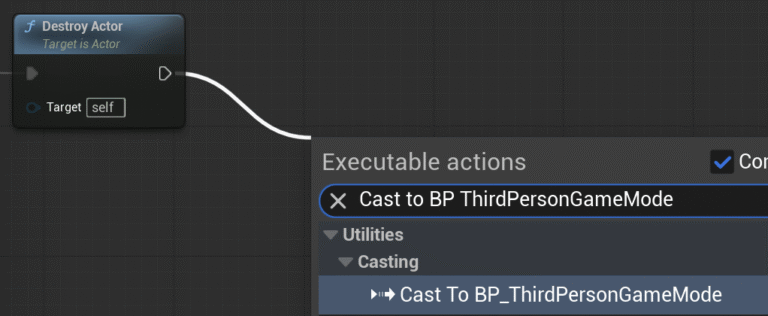
In our collectable object blueprint, drag out from the right arrow of “Destroy Actor” and release. Type and select “Cast To BP_ThirdPersonGameMode”.
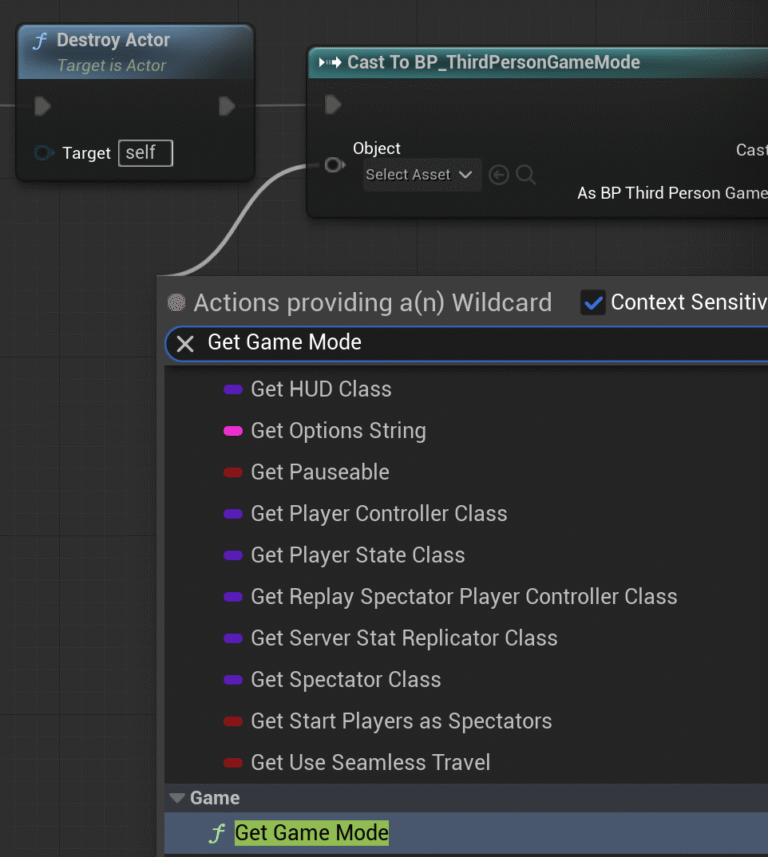
From the blue Object input of the new node on the left type and select “Get Game Mode”
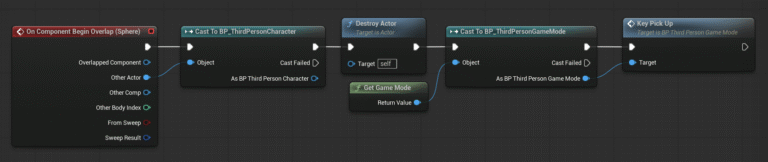
Finally, from the right “As BP Third Person Game Mode” pin, type and select “[Item] Pick Up” (this is the function you named earlier). Your Event Graph should look like this.
Click compile and test. When you pick up your collectable you should see a pale blue “1” in the top left corner. If you place multiple collectables in the scene this number will increase further.
In this lesson we are going to create the first Blueprint in our Unreal Editor toolbox. Feel free to use your own 3D model or this key (you will need to decompress the zip file).
Ensure your collectable item is combined into one object, by selecting the objects (Q) and using Mesh > Booleans > Union or Mesh > Combine.
I also recommend moving your object to the center of the grid plane, this will make moving the object easier.
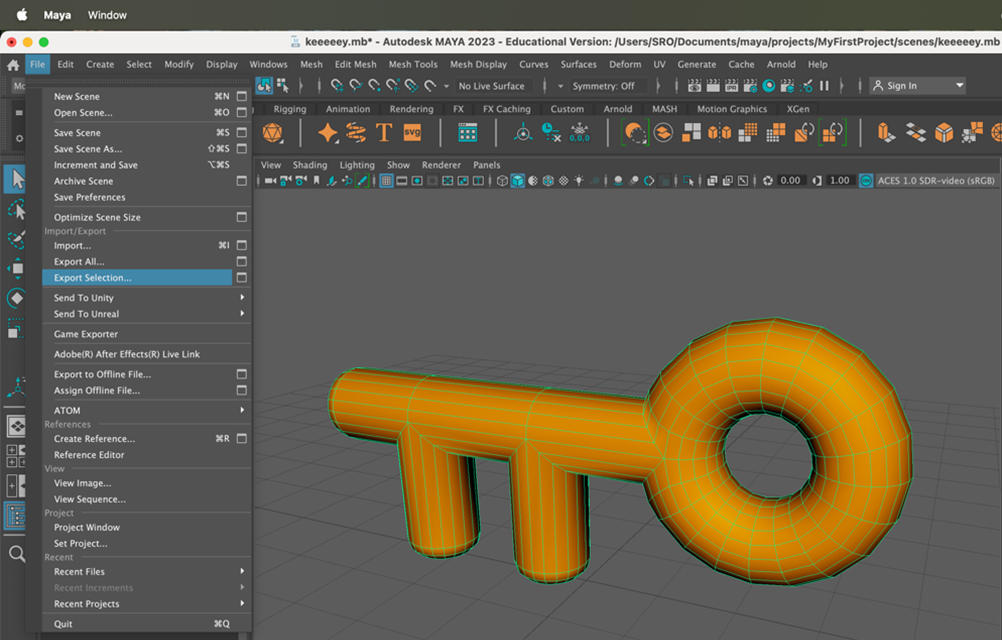
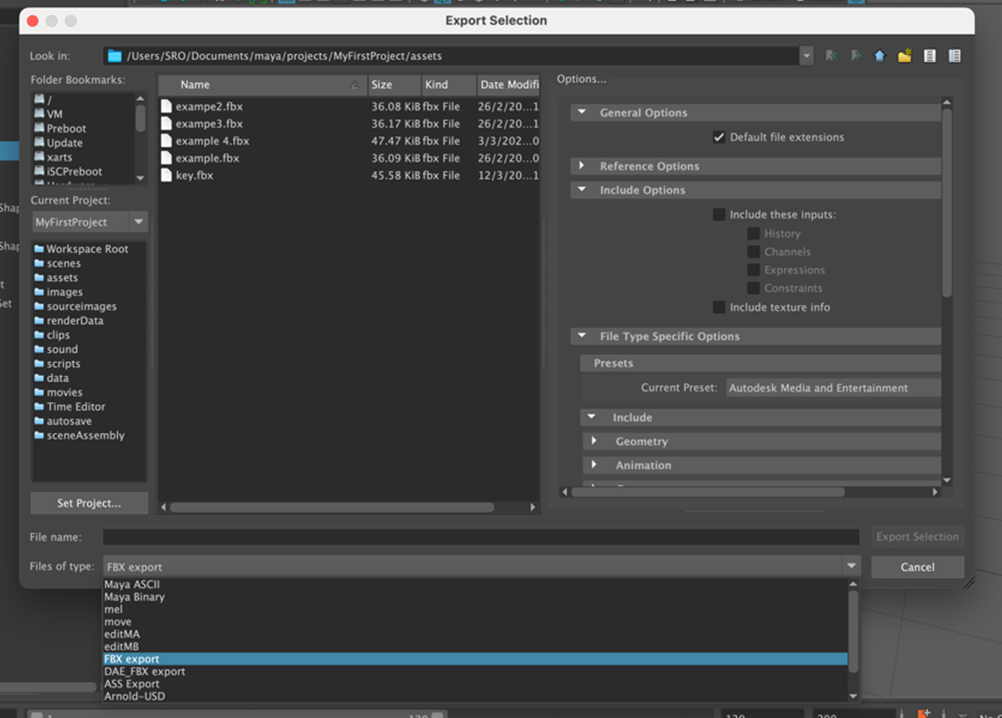
Export your collectable from Maya by selecting your object (Q) and clicking File > Export Selection.
While exporting be sure to change File of Type to FBX export.
If you are using a textured model be sure to tick “include texture info”.
Name your FBX file something easy identifiable and save it to your Maya assets folder.
Importing your collectable
To import your collectable into Unreal Editor open the Content Drawer in the lower left corner, press Add > Import to /Game…
After selecting your object in files a popup menu will come up, while these settings are often important, we will use the default options today, press import.
The Key Should now be in the Content Drawer as a Static Mesh.
Creating a new blueprint
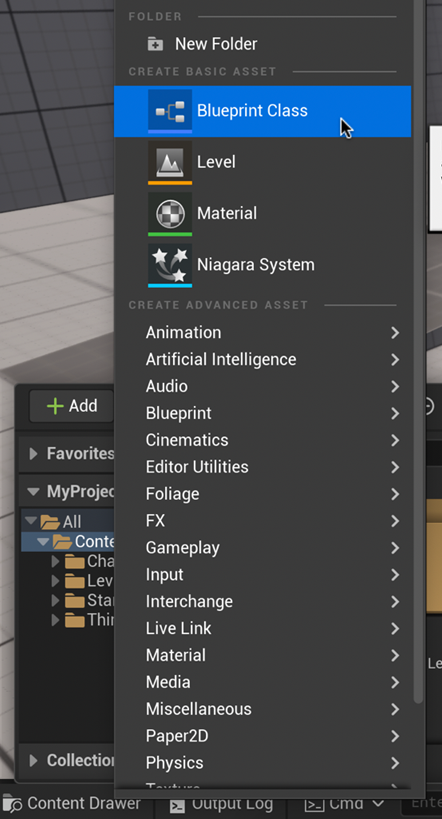
To create a blueprint your open Content Drawer, select Add > Blueprint and choose Actor from the pop-up menu.
So we can effectively use it later, we will name it something that helps us identifies it as a blueprint; as our collectable is a key, name it BP_KeyCollectible.
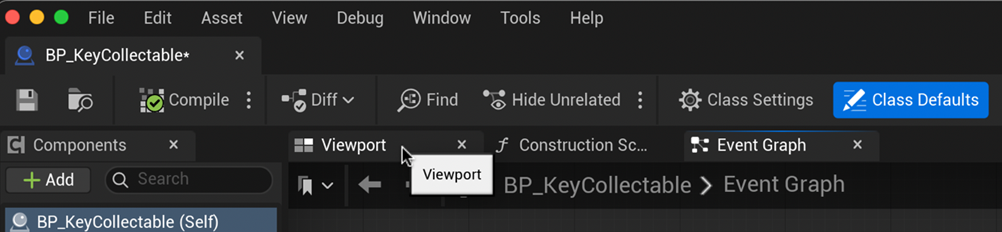
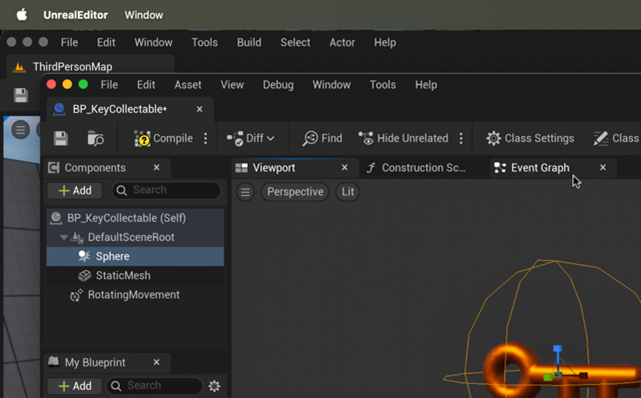
Double-click your newly created Blueprint to open it.
We are now going to add our 3D object into the Blueprint. You may need to change the view to “Viewport”
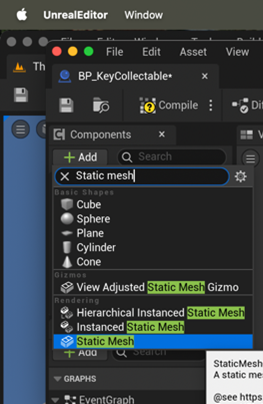
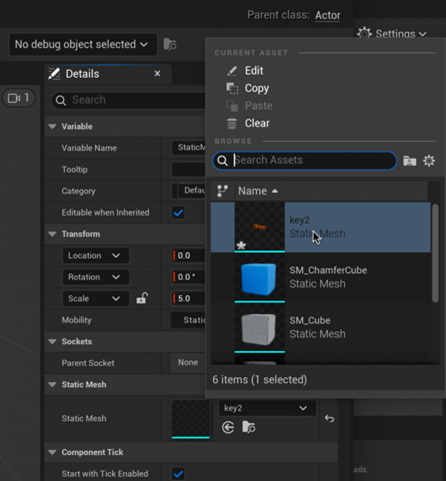
Using the Components menu in the top left click Add. Type “Static Mesh” in the search window and select it when it appears in the menu.
In the right-side Details panel, select your key in Static Mesh. At this point you may want to scale or reposition your object.
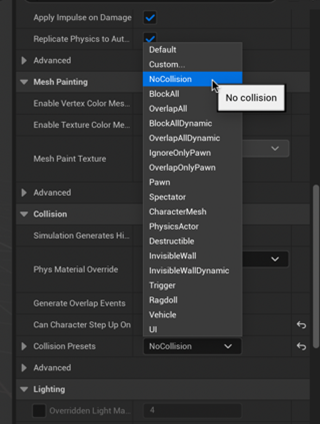
While we are in the Details panel, set the Collision Preset to NoCollision so that the player character won’t bump into the collectable as they pick it up.
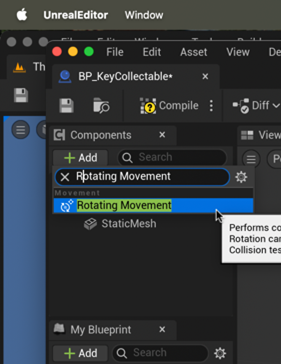
Let’s make our collectable easier to see by making it rotate on the spot.
Back in the Components panel on the left, click Add and type “Rotating Movement”, select this when it appears below. For now, we will use the default rotation rate.
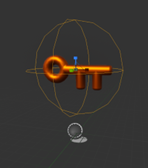
Return to the main window and click play to test the rotation effect. Be sure to drag the blueprint from the Content Drawer and not the static mesh.
Next, let’s add collision so that our character can pick up the collectable. In the Components menu click Add, type “Sphere Collision” and select this option when it appears. Move and scale this sphere so it surrounds the Static Mesh.
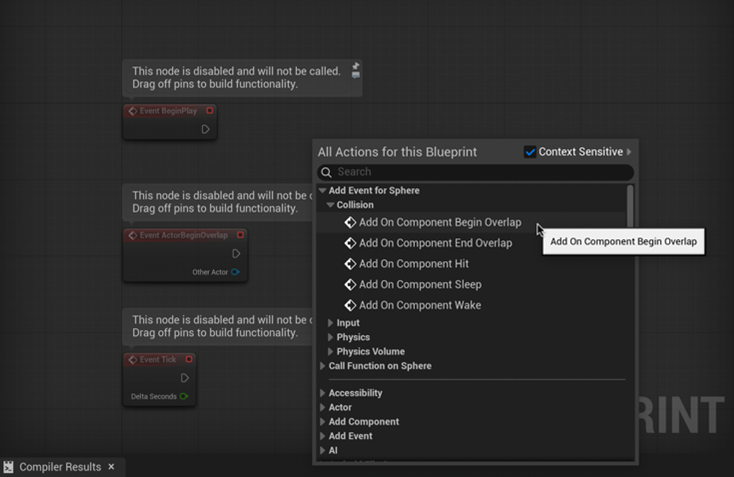
Now we need to tell our Collision Sphere how to operate. Select “Sphere” in the Components menu and click the Event Graph tab above the Viewport. This screen allows us to program how our collectable operates.
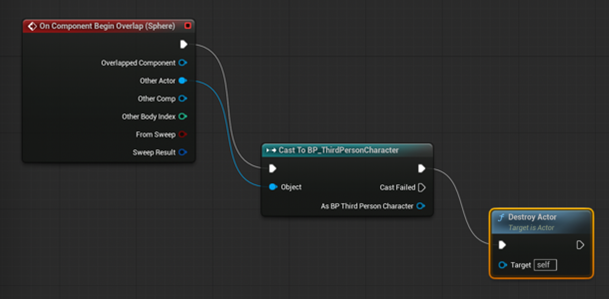
To add a new event, we need to right click a blank area of the Event Graph. Through the menu select Add Event for Sphere > Collision > Add on Component Begin Overlap.
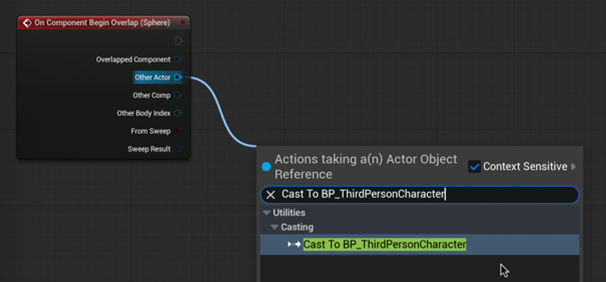
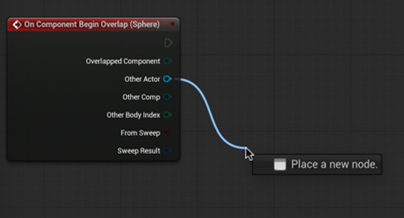
Drag from the arrow next to “Other Actor” and release into a blank space to create a new action. After releasing type and select “Cast To BP_ThirdPersonCharacter” from the list. This sets the conditions for activating the collectable.
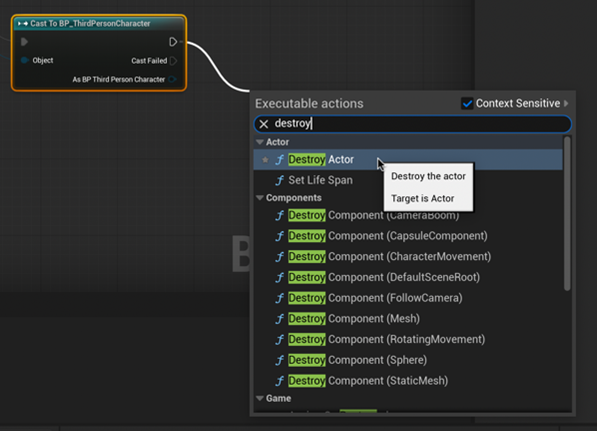
Finally, let’s make the collectable disappear when we collect it. From the top right arrow of Cast To BP_ThirdPersonCharacter drag and release to a blank space in the Event Graph. Type “Destroy Actor” and select this from the menu.
When completed, our Event Graph should look like this.
Return to the main window and click play to test. Don’t forget to drag the blueprint (not the object) out of the Content Drawer and into the scene first.